This post may contain affiliate links. Read the full disclosure here.
Fall always brings out my love for elegant pumpkin decor! As a mom of three energetic boys, I know firsthand how lively our house gets this time of year. There’s something special about adding stylish pumpkins that fit right in with all the action, but still keep our home looking pulled together. I enjoy finding simple, beautiful touches my boys can help with, and it makes the whole season feel extra cozy.
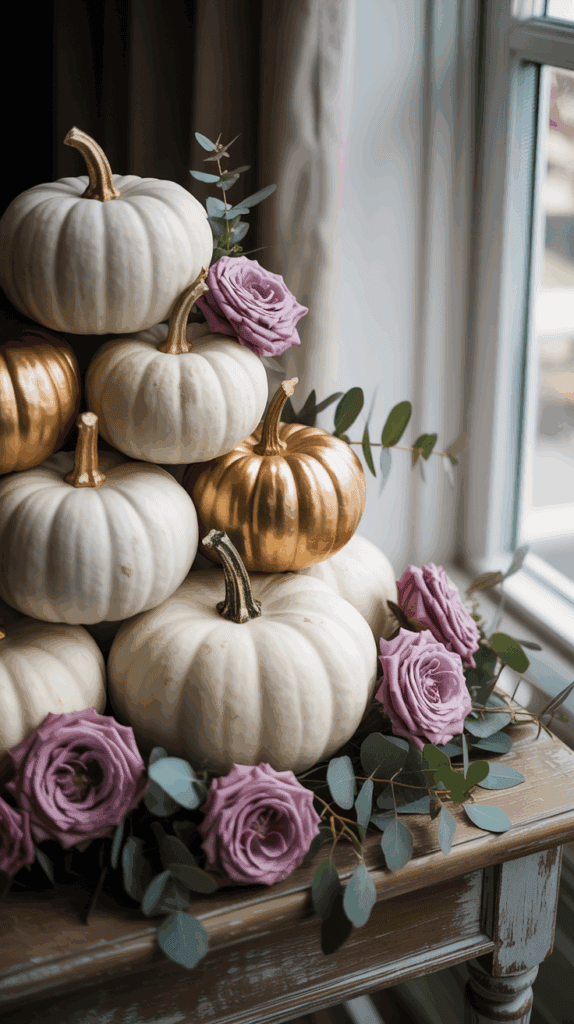
This white ceramic pumpkin set adds the perfect touch of simple elegance to any fall room.
Every autumn, I look forward to decorating the house in a way that feels warm but not overwhelming. I promise, you don’t need fancy tools or a lot of time to create a space that feels inviting for both grown-ups and little ones. If you’re after ideas that add just the right amount of charm—and won’t get destroyed in five minutes—stick around. I’ll share my favorite quick, kid-friendly ways to style your home with pumpkins, so your space feels both beautiful and lived-in!

- Choosing the Right Pumpkins for Elegant Decor
- Styling Techniques That Elevate Pumpkin Decor
- Placing Pumpkins in Every Room
- Quick DIY Projects for Busy Moms
- Keeping the Elegance Fresh All Season
- Preserving Fresh Pumpkins: Simple Spray-Water Method and Cool, Dry Storage
- Safe Storage and Reuse for Next Year
- Conclusion
Choosing the Right Pumpkins for Elegant Decor


The secret to truly elegant pumpkin decor is picking the right pumpkins right from the start! I still remember the first time I picked out pumpkins with my boys, and how a tall one mixed with a quirky round one totally changed our whole front porch. When you take just a minute to consider size, shape, and color, your fall decorations instantly look a hundred times more polished—without losing any family-friendly fun.
Size and Shape Matter

When I take my crew to the pumpkin patch, we make a little game out of choosing shapes. Every pumpkin has its own personality, and mixing up the size and shape creates a beautiful display. Here’s what I keep in mind (and my kids love helping too):
- Tall, slim pumpkins: These add instant height to any vignette. Line them up on a mantel or next to the door for a touch of drama. They keep things from looking flat or dull.
- Classic, round pumpkins: I always grab a few of these for balance. Their sturdy shape anchors any pumpkin display and brings a cozy, familiar vibe.
- Odd and quirky shapes: Don’t shy away from pumpkins with curves, bumps, or even a slight lean. These are usually the first ones my boys want to carry home! Odd shapes help break up symmetry, spark conversation, and add some whimsy.
Before you toss your pumpkin into the cart (or stroller, if your hands are full!), give it a quick squeeze. I always check that it feels firm, especially around the stem and bottom. If it feels soft or seems spongy, it may not last very long. Trust me, nothing ruins a beautiful tablescape like a surprise pumpkin puddle! A firm pumpkin not only lasts longer but keeps your home cleaner and safer for little hands.
Natural Shades and Color Variations
I’m a fan of classic orange pumpkins, but there’s a whole rainbow to explore these days. Different shades can instantly lift your decor and make even a simple set-up feel extra chic.
Here are my favorite color options:
- Deep orange: This is a staple in my house. The rich tone pops against wood, baskets, or nearly any background.
- Ivory and creamy white pumpkins: These look almost delicate, but they’re tough enough for small hands. Pair them with neutral linens and greenery for a calm, elegant pumpkin decor style.
- Soft gray, pale yellow, or even blue pumpkins: These add a gentle surprise, especially when grouped together on a dining table or by the fire.
Pairing pumpkins with neutral accessories (like beige throws, light wood stools, or soft woven baskets) helps the colors stand out without overwhelming your space. When I style a group of pumpkins in different shades, I always step back, squint a little, and check if the balance feels right. It’s like mixing paint on a palette—sometimes it’s the subtle tones that make everything sing.
A quick tip: If you can, choose pumpkins with strong, healthy stems. This little detail adds a finishing touch and makes each pumpkin feel special. My youngest always inspects them, and now it’s a bit of a family tradition—finding “the perfect stem” for each spot in our home.
Adding a mix of sizes, shapes, and colors is my low-stress way to elevate fall decor. It feels personal, warm, and just fancy enough to impress the neighbors!
Styling Techniques That Elevate Pumpkin Decor

When it comes to elegant pumpkin decor, I love taking ordinary pumpkins and giving them a bit of personality! There’s something so satisfying about using a few simple tricks to make pumpkins pop, all while keeping things child-friendly and stylish. If your kids are anything like mine, they want to help with every project—so these methods are perfect for busy, hands-on families who want glamour without the mess.
Metallic Paints and Finishes

A hint of shimmer can turn even the plainest pumpkin into the star of your autumn room. I started using metallic paints after my boys insisted their pumpkins needed to “sparkle like treasure!” All it takes is a thin coat of gold or copper spray paint, and suddenly you have a pumpkin that shines like a jewel on your table.
Here’s what I’ve learned for a stress-free, family-friendly paint session:
- Choose low-odor, fast-drying spray paints. Kids’ noses are sensitive, and you don’t want lingering fumes in the kitchen or entryway.
- Child-proof brushes or foam sponges work great. If the spray can feels tricky, let little hands dab on a metallic finish with brushes instead. It’s less mess, more fun.
- Protect your surfaces. I always toss down an old sheet or plastic tablecloth. Pumpkins roll, and paint splatters can travel!
- Let each pumpkin dry fully before moving it. My boys love poking at the wet paint, which can lead to unintended finger art.
Metallic pumpkins look amazing in a group, especially when mixed with natural ones. Place a copper pumpkin near an ivory one for instant contrast. Golds pair well with burnt orange or even pale blue. The best part is how the light bounces off the metallic surface, giving your display a touch of grown-up polish that still lets the kids say, “I did that!”
Fabric Wraps and Textured Ribbons

If painting is a bit too much for today (or if you’re like me and have a pile of fabric scraps just waiting for a purpose), fabric-wrapped pumpkins are a must. There’s something so warm about wrapping a pumpkin in linen, burlap, or even velvet—honestly, it’s like giving your decor a cozy sweater!
Here are my go-to ways to dress up pumpkins with fabric and ribbons:
- Choose light, flexible fabrics like linen, cotton, burlap, or velvet. The fabric should bend easily around curves.
- Cut a square large enough to wrap around the pumpkin. Big pumpkins need more; mini pumpkins need less. No need to be exact.
- Gather the fabric at the stem and tie it off with a stretchy hair tie or a piece of twine. Simple and secure.
A pile of pumpkins tied with satin or grosgrain ribbon feels pure luxury! If you want to involve the kids, here’s our house favorite for ribbons:
Quick Knot How-To for Little Hands:
- Drape ribbon under the pumpkin.
- Bring both ends up and meet them at the top by the stem.
- Cross the ends once, then pull snug.
- Tie a simple bow, like shoelaces. Voila! Instant style.
This is such a kid-friendly project because it’s soft, safe, and you can change out colors or textures to match the rest of your autumn decor. Velvet ribbons in cream or deep green look rich; classic gingham or polka dots add a playful twist. Plus, if your ribbon slips or fabric sags, just adjust it—no glue required.
Mixing and matching these wraps with metallic pumpkins gives your space depth and variety. It’s a clever balance of shine and softness, and every pumpkin feels like its own little work of art. Best of all, even my youngest can wrap a pumpkin, and that sense of accomplishment goes a long way during the busy fall season!
Placing Pumpkins in Every Room

Adding elegant pumpkin decor to every room fills the whole house with warmth and style! I like to bring autumn cheer to more than just the front step. There is something about seeing a little pumpkin in each space that makes the season feel extra special. When you cover every corner, it keeps your home feeling festive, and let’s be honest, the kids will always spot a pumpkin before you do! Here are a few ways I style pumpkins in the busiest rooms of our house, from the living room all the way to the play area.
Living Room Centerpieces
I love to use pumpkins as the heart of our living room during fall. On the coffee table, I usually arrange three pumpkins with different heights, which instantly creates a natural focal point. The rule of threes is not just for decor pros—it works because it keeps displays interesting without looking cluttered.
To make the centerpieces pop:
- Place the tallest pumpkin toward the back, the medium one just beside it, and the smallest near the front.
- Set a couple of candles around them for a soft, warm glow at night. I’m always a little nervous about open flames, so I use LED candles instead. They give the same cozy feeling with none of the stress.
- Sprinkle in a few acorns, mini pinecones, or a length of leafy garland to pull everything together.
If you want a little more sparkle, weave a string of battery-powered fairy lights through the display. I always tuck away any extra cord behind a stack of books or coil it under the table’s edge so my boys don’t find something new to tug. Keeping cords hidden and out of reach is a must, especially if your little ones are curious!
This simple pumpkin trio looks grown-up, but it still feels inviting for family movie nights or afternoon snacks. It’s the spot everyone notices first, and every year, my youngest tries to choose which pumpkin is “the king of the table.”
Kids’ Play Area Touches
When decorating the play area, I always focus on both style and function. With three active boys, nothing in our play corner stays untouched! Low-profile pumpkin stools are a big hit. They are sturdy enough for coloring time or pretend games, but soft and light enough to move about. I pick ones with either felt or plush covers, sometimes shaped like pumpkins, sometimes just orange or cream. They make the space cheerful and practical at the same time.
Another easy idea is using painted pumpkin bowls to hold crayons, markers, or even LEGOs. I have a few ceramic bowls shaped like small pumpkins. I fill them with craft supplies and line them up on a shelf or play table. Whenever the boys want to color, they love pulling down a bowl—there’s always a “which color pumpkin do you want?” debate! These bowls add a sweet seasonal touch and keep our supplies easy to find and put away.
Here’s why pumpkin touches in the play area work:
- Stools give an autumn look without any sharp corners.
- Bowls can double as snack dishes or sorting trays for little treasures.
- Both ideas mix fun and style, so even the playroom feels pulled together.
If you want quick style with zero stress, just swap the bowls or stools out once autumn ends. I always keep a couple for year-round play because the kids are attached, but you could switch them for different themes as the seasons change. Elegant pumpkin decor isn’t just about looking pretty—it’s about making every room feel cozy, family-friendly, and ready for fun!
Quick DIY Projects for Busy Moms

Finding time to decorate with three energetic boys at home? I get it! It can feel impossible some days, but I have some favorite quick projects that turn simple pumpkins into elegant pumpkin decor in minutes. These little touches bring style and sparkle to our fall space, plus the kids can jump in to help. The best part? These projects are budget-friendly, easy, and perfect for busy schedules.
Paint‑Over Pumpkin with Simple Stencils
Painting pumpkins is always a win in my house. I love how a fresh coat of pretty paint and a cute stencil makes a plain pumpkin look like it came straight from a boutique. Even when I only have a little time before dinner, we can finish a whole batch together. Letting the kids brush on the color feels like a treat, and the finished pumpkins look fantastic! Here’s how we do it:
Supplies You’ll Need:
- Real or faux pumpkins (pick small, medium, or mini pumpkins)
- Acrylic paint (choose classic white, soft gray, gentle pastels, or metallic shades)
- Painter’s tape or repositionable spray adhesive
- Stencil of your choice (think leaves, dots, chevrons, or even letters)
- Assorted paintbrushes and foam sponges
- Damp rag for quick clean-ups
How We Paint Our Pumpkins:
- Pick Your Pattern: I let each child choose their favorite stencil. We love leaves and simple geometric shapes, or even initials for a personalized touch.
- Tape Down the Stencil: Stick the stencil to the pumpkin with skinny painter’s tape or just hold it tight if you’re feeling patient. (I usually go for quick and sticky with little hands in the mix.)
- Paint, Paint, Paint! Let the kids dab on the paint. Foam sponges make it easy, and you don’t have to worry about precise strokes. I encourage them to use a blotting motion so paint doesn’t seep under the edges.
- Lift and Admire: Peel off the stencil while the paint is a little damp. It’s always our favorite part! Place the pumpkin somewhere safe to dry.
Mom Tip: If you want tidy lines, stick with thicker stencils and press the edges down well. For rambunctious painters, loose patterns still create a playful look. If anything smears, a swipe of the damp rag cleans up most mistakes before the paint sets.
You end up with fresh, crisp designs that look amazing on a porch, fireplace, or even doubled up as a table centerpiece. Plus, kids feel like real artists!
Mini Pumpkin Terrarium

Mini pumpkin terrariums are always a highlight on our kitchen counter. It’s part project, part tiny autumn wonderland! Imagine a mini forest scene, tucked right inside a pumpkin. This easy, hands-on idea never fails to excite my boys—they can poke, tweak, and play with the setup, which keeps them busy and proud. Here’s how we make ours, safely and simply.
Steps to Build Your Terrarium:
- Pick a small or mini pumpkin. I look for squat, flat-bottomed ones so they don’t wobble.
- Slice off the top using a sharp paring knife (this part is best for adults). Make a wide opening, just like you would if scooping out for jack-o’-lanterns.
- Clean it out: Scoop out seeds and stringy bits. Wipe the inside dry with a paper towel.
- Let the kids choose their materials for filling. We like:
- Bagged moss (from the craft or garden store)
- Smooth pebbles or small river stones
- Tiny animal or fairy figurines
- Mini pinecones, acorns, or dried flowers
Layer the Fun:
- Sprinkle a layer of stones in the bottom for drainage.
- Add a mound of moss on top, letting some spill over the edges for a plush look.
- Tuck the figurines or decorations into the moss. Sometimes we create tiny “paths” or “nests” if my boys are feeling creative that day.
Safety Tips: I always slice the pumpkin myself, then pass it over to the kids for decorating. Make sure any sharp tools are stored and handled by grown-ups only. Remind little ones to keep their fingers away from the freshly cut edges, since they’re sometimes a little rough.
The end result looks like a little scene from an autumn fairy tale, right in your own home! Set a few of these along a window ledge, shelf, or even as a quirky table centerpiece. If the pumpkin starts to get soft after a week or so, just swap it for a new one—easy as pie.
These fast, fun pumpkin projects give your home serious fall charm, while letting the kids feel like they had a real part in making it. And that, to me, brings true elegance to everyday autumn life!
Keeping the Elegance Fresh All Season
Nothing makes me more proud than when our elegant pumpkin decor lasts the whole fall without turning into mush! With three boys in tow, every pumpkin gets touched, moved, and sometimes even rolled across the floor. It’s like a tiny experiment to see which pumpkin survives the season. Over the years, I’ve picked up some simple tricks to keep our displays looking charming and mess-free. I love knowing I can stretch our pumpkins’ lives, and maybe, just maybe, reuse a few favorites next year. Here’s how I keep everything fresh and lovely, straight through Thanksgiving.
Preserving Fresh Pumpkins: Simple Spray-Water Method and Cool, Dry Storage
A drooping, moldy pumpkin never looks elegant—trust me, I’ve learned this the hard way! To keep those pretty gourds firm and glowing, I use a simple water spray and store them where the kids can’t sneak a snack (yes, it happens).
Here’s my go-to routine to prevent rot and keep every pumpkin ready for its close-up:
- Let them dry: I place them upside down on a clean towel. Moisture is a pumpkin’s worst enemy, so don’t rush this part!
- Spray with water every few days: I fill a spray bottle with cool water, add a dash of vinegar, and give each pumpkin a light mist. This helps the skin stay hydrated and the surface clean.
- Keep them cool and dry: I store our pumpkins somewhere away from heating vents, sunny windows, and the ever-curious cat. A shaded porch, cool garage, or a dry basement works great.
- Flip them every week: Just a quarter turn helps air circulate and keeps soft spots from forming. I make this a game for my boys, so they feel like “pumpkin guards.”
A little care goes a long way! Most years, our pumpkins stay fresh for a month or more. If one starts to get soft, I move it outside for the squirrels—they love a fallen pumpkin snack. That way, nothing feels wasted.
Safe Storage and Reuse for Next Year
I love the idea of making pumpkin decor last past Thanksgiving! Sometimes we create painted pumpkins that feel too special to toss away. Other times, those faux pumpkins from the craft store get a new life with a little cleaning and paint.
Here’s how I store and reuse pumpkins for next year’s elegant pumpkin decor projects:
- Clean thoroughly: Remove ribbons, leaves, or any leftover glue. I wipe faux pumpkins with a damp cloth, letting them dry out completely.
- Paint over old designs: If last year’s design looks faded, I give it a fresh coat of paint. Acrylics work great and cover up any scratches or stains.
- Store in a sealed container: I use a big plastic tote with a tight lid. I add a few packets of silica gel or a handful of dry rice in a sock to absorb any stray moisture.
- Label the container: A little masking tape and a marker keep me from opening twenty bins next September.
Here’s a simple table to organize your pumpkin storage process:
| Step | What to Do | Supplies Needed |
|---|---|---|
| Clean and dry | Wipe or wash, let fully dry | Damp cloth, paper towels |
| Paint touch-up | Add fresh paint if needed | Acrylic paint, brushes |
| Package securely | Seal in tote, add moisture aid | Plastic tote, silica gel |
| Save decorations | Bag up ribbons or extras | Zipper bags, labels |
This is my secret for keeping things tidy. When the next fall rolls around, I feel so organized—I already have my “pumpkin starter kit” ready to go. My kids race to see which painted pumpkin comes out first!
A little prep at the end of the season means more fun, less mess, and even more style next autumn. Plus, it’s such a good feeling to reuse something you created together as a family. My boys always remember which pumpkin they painted the year before, and it instantly makes our decor feel personal and special.

Conclusion
I love how elegant pumpkin decor can completely change the feeling of our autumn home while still staying safe and fun for my wild crew. With the right mix of colors, simple DIY touches, and a few tricks to keep everything fresh, it’s so easy to create a space that both parents and kids can enjoy all season. Even with three busy boys, our pumpkins keep their charm and bring a smile whenever I see them in each room!
You don’t need a fancy plan or special skills. Just a little creativity and the willingness to let the kids join in make every display feel personal and inviting. If you try any of these ideas (or come up with your own), I’d love to hear about it! Please share your favorite pumpkin moments or photos. Thank you for letting me be part of your autumn—happy decorating!