This post may contain affiliate links. Read the full disclosure here.
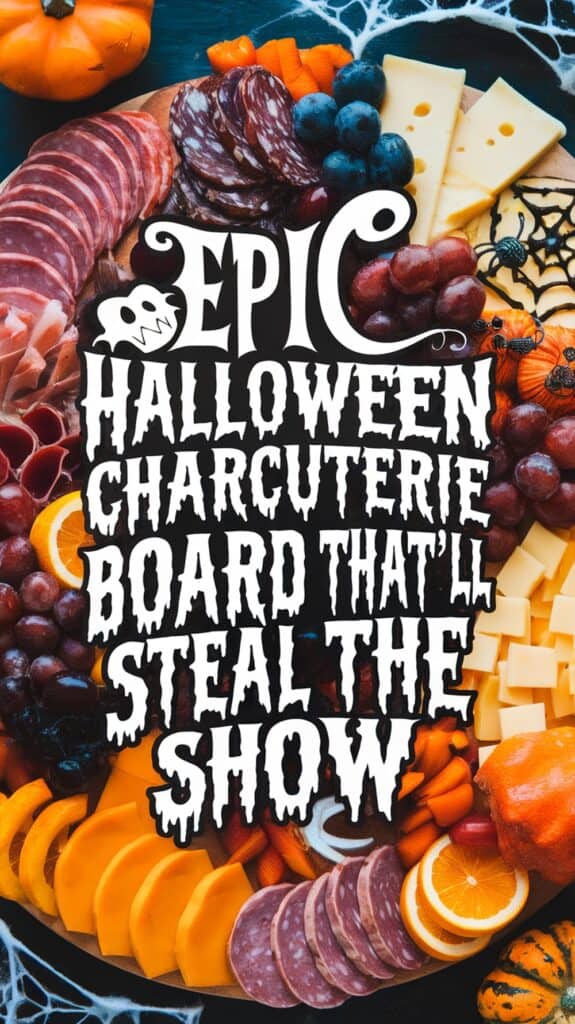
Hey there! As a mom of three energetic boys, Halloween is always a busy (and wild) time at our house. My kids start talking about costumes and spooky treats weeks in advance! It’s their favorite holiday, and honestly, it’s mine too. Nothing gets them more excited than seeing our snack table filled with halloween themed charcuterie boards loaded with sweet, salty, and silly bites!
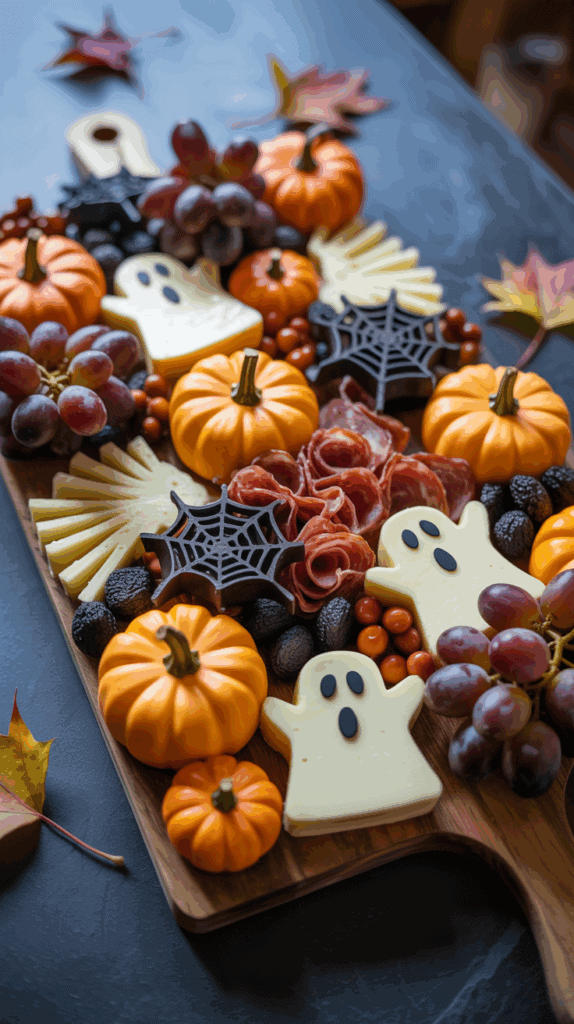
This pumpkin-shaped wooden board instantly made our snack table look festive and fun.
We set these up for our cozy fall birthday parties every year!
These boards aren’t just for the kids, either. Grownups love them just as much, whether we’re running around to parties or having a cozy night in. I’ve learned how much a playful snack spread can bring everyone together—even picky eaters.
If you want an easy way to wow your guests this October, you’ll love how simple and fun these ideas are. Let’s make this Halloween both magical and delicious!
Why Halloween Charcuterie Boards Are the Perfect Party Trick
When Halloween rolls around, I want every part of our celebration to feel full of magic and excitement—especially the food. That’s where halloween themed charcuterie boards come in handy! They’ve become my go-to “party trick” for busy moms, fun-loving kids, and everyone in between. With charcuterie boards, you get more than snacks on a tray; you get a centerpiece that wows your guests and encourages even the pickiest eater to grab a treat.

Here’s why these boards are always a big win at our house.
Instant Wow Factor
There’s something so inviting about a platter piled high with bite-sized goodies. Kids race to the table the second they spot a board full of googly-eyed cheese balls, bat-shaped crackers, and candy corn. Adults linger nearby with drinks, scooping up little handfuls. The color, variety, and fun shapes make these boards the star of the snack table.
- Themed ingredients make any spread feel festive.
- You can add a mix of colors—purples, oranges, greens, and blacks.
- Tiny food picks and silly decorations make it memorable.
Even a simple board with crackers, sliced cheese, and a handful of grapes looks magical with the right Halloween touches. It’s the perfect balance of playful and practical.
Super Easy to Personalize
What I love most about charcuterie boards is how easy they are to make your own. You don’t need fancy skills or hard-to-find ingredients—most of the items come from the regular grocery store. My kids love helping out by picking snacks and arranging them on the board. Sometimes I let them create spooky faces out of olives or stack mini sandwiches.
- Mix sweet, salty, crunchy, and chewy items.
- Include allergy-friendly options like gluten-free crackers or nut-free candy.
- Arrange for different age groups (simple for toddlers, spicy options for adults).
You can pull together a board last-minute or spend a full afternoon making it detailed. There’s no right or wrong way, which takes away a lot of pressure.
Zero Fuss for Busy Parents

Some party snacks take hours of baking and decorating. Not these! One of the biggest perks of halloween themed charcuterie boards is that you can throw them together in 20 minutes or less. I’m usually sneaking this in while helping the boys with their costumes or answering the door for trick-or-treaters.
- No cooking needed (unless you want to).
- Use pre-cut cheese, store-bought dips, and ready-to-go fruit.
- Minimal cleanup since everything is bite-sized and easy to grab.
Boards do double duty as decor and food, which saves me time and energy. That’s always a win!
Satisfies Every Appetite
Not every guest likes the same treats. With a charcuterie board, you don’t have to worry about anyone feeling left out. I always include a few healthy bites, some sweets, and plenty of savory items. There’s room for everyone’s favorites, from chocolate-covered pretzels to grapes shaped like eyeballs.
Here are some of my go-to fillers:
- Cheese slices and string cheese
- Mini crackers
- Popcorn or caramel corn
- Seasonal candy (gummy worms, candy corn)
- Fruit like grapes, apple slices, or dried apricots
- Sliced deli meats or rolled-up turkey
The mix keeps kids coming back for seconds and gives grownups something more interesting than plain chips and dip.
Acts as Both Snack and Decor
One of my favorite surprises is how a well-made board pulls double duty as a centerpiece. When I set one of these out, it makes the whole room feel festive—sometimes even more than our store-bought decorations. With a playful mix of colors and seasonal touches, you can make the board as spooky or silly as you want.
Add a few of these extra touches for a boost:
- Use a spiderweb napkin or bat-shaped platter as the base.
- Sprinkle candy eyeballs or plastic spiders on the board.
- Add toothpicks with little pumpkins or ghosts at the top.
It turns snacking into an experience, not just a meal.
Halloween charcuterie boards have become my party trick for a reason—they’re quick, colorful, and get everyone in the spirit. If you want to wow guests and keep things easy, this is the way to go!
Building the Ultimate Halloween Themed Charcuterie Board: Tips & Tricks
Halloween themed charcuterie boards are my favorite way to add a little magic to the snack table. I swear, it’s the one thing that never fails to get everyone talking at our parties! Before you rush out to buy treats and decorations, a little planning makes all the difference. Let me walk you through the easy tricks that keep my boards looking spooky, colorful, and totally delicious.
Choosing the Right Board and Layout
First things first, the board itself matters. I’ve used everything from fancy wooden trays to my kids’ plastic Halloween plates. The board sets the stage and helps hold everything in place, so pick something sturdy and big enough for your crowd.
Here’s how I choose and arrange mine:
- Go for size over style. If you’re feeding a group, even a rimmed cookie sheet works. Bigger is better for certain.
- Shape adds fun. A round board makes it easy to build spiral or web-like shapes, while a rectangle lets you section off sweets, meats, and cheeses.
- Cover the base. Lining with parchment or a themed napkin makes cleanup easy and adds flair.
- Start with anchors. Place bowls for dips, clusters of cheese, or a mini cauldron of candy first. This creates structure on your board.
- Build out from the center. I like putting the biggest, boldest items in the middle and working out in loose circles or lines.
- Fill every space. Gaps make a board look sad. Use clusters of grapes, popcorn, small candy, or baked cheese crackers to create that overflowing, haunted house look.
Keep it easy! No need for perfect lines. Let the kids help—they love plopping marshmallow ghosts in silly spots.
Must-Have Halloween Colors and Design Themes
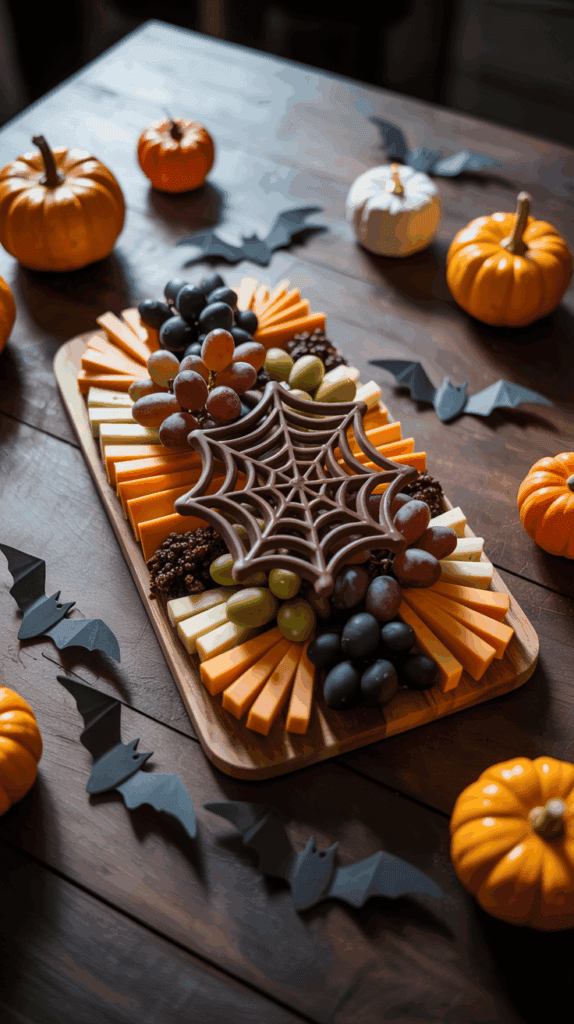
When I picture halloween themed charcuterie boards, color is what always gets the “wow!” reaction. Think classic orange and black, plus a jolt of purple or green for a true Halloween vibe.
Here are some playful ways I add a pop of spooky color:
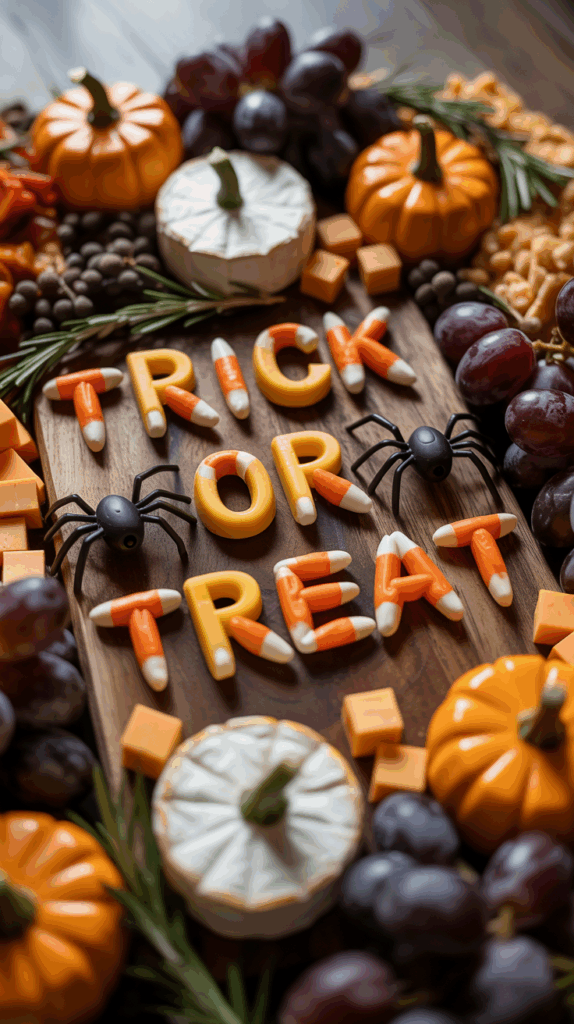
- Orange: Cheddar cubes, clementines, candy corn, and carrot sticks
- Black: Blackberries, olives, dark chocolate pieces, or licorice
- Purple: Grapes, beet chips, or even purple frosted cookies
- Green: Gummy frogs, green apple slices, or wasabi peas for adults
If you want to pull your look together, try one of these easy design tricks:
- Arrange snacks into a giant candy corn or pumpkin shape right on the board.
- Use plastic spiders, tiny tombstones, or eyeball sprinkles. Edible eyes are a huge hit—my boys always grab those first!
- Add themed picks, like witch hats, for a touch of whimsy.
A simple color theme makes even the most random snacks feel like they belong together. Plus, it looks awesome in photos!
How to Balance Sweet and Savory Treats
A killer charcuterie board isn’t just pretty—it’s tasty! The best boards keep everyone happy by mixing sweet and savory bites. I make sure there’s something for adults and plenty for snack-happy kids.
Here’s my quick formula for balance:
- Start with savory favorites:
- Sliced cheeses (mild and sharp)
- Deli meats or turkey roll-ups
- Crackers, pita chips, or breadsticks
- Roasted nuts for a crunch (if there are no allergies)
- Mini pickles or olives for a tangy bite
- Add sweet treats sprinkled throughout:
- Chocolate-covered pretzels (bonus points for Halloween shapes)
- Spooky marshmallows or ghost-shaped cookies
- Gummy worms crawling out from the cheese
- Fresh fruit like grapes or apple slices (kids love “monster mouths” made with apple and mini marshmallows)
- Candy corn tucked here and there
- Sprinkle in a few “combo” snacks:
- Caramel popcorn (both sweet and salty)
- Yogurt-covered raisins
- Chocolate-dipped pretzel rods
The trick is to keep each flavor in small, easy-to-grab portions. I also group similar flavors together so tastes don’t get mixed up. And if you have little ones, keep candy up high or off to one side so grownups can monitor the sugar rush.
My favorite thing is seeing everyone’s plates with a little of everything—salty, sweet, crunchy, chewy. That’s when I know the board is a success! Let the kids explore new combos (cheese and chocolate, anyone?), and don’t be afraid to break a few snack “rules.” Halloween is all about having fun, after all!
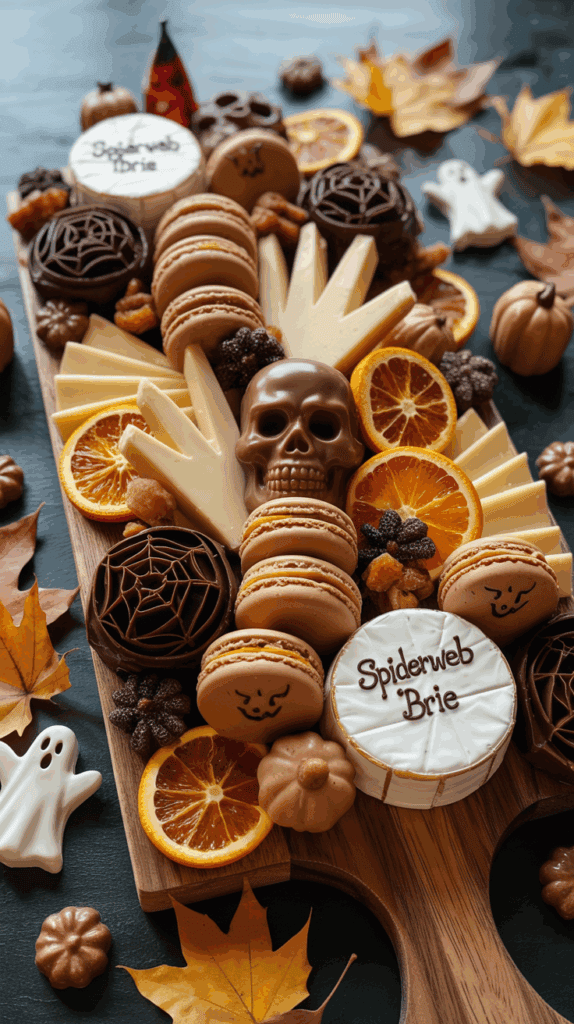
Frighteningly Fun Ingredients & Creative Food Ideas
Building halloween themed charcuterie boards is where things really get exciting! This part always makes me feel like a “mad scientist” in the kitchen. My boys start buzzing with ideas, tossing out wild snack combos that sometimes surprise me with how cute (and hilarious) they look together. Whether you’re aiming for eerie, cute, or just plain silly, these easy ingredient ideas make the board the star of any party.
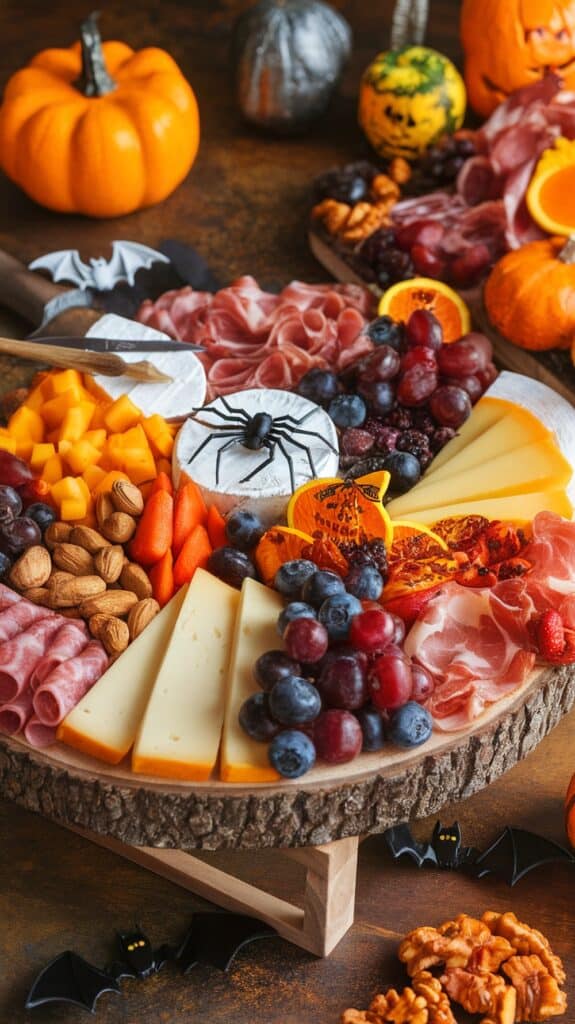
Savory Bites: Ghostly Cheeses and Mummy Meats
When I say “ghostly cheeses,” I’m talking about crowd favorites that are transformed with a little imagination. All you need is a cookie cutter, some peppercorns, or a black olive or two to turn an ordinary snack into a spooky treat. Cheese is always a hit in our house. The more shapes, the better! Here’s how I make it fun:
- Ghost Cheese Slices: Cut white cheddar or mozzarella with ghost-shaped cutters. Use a mini straw to poke “eyes” or stick on a couple pieces of black olive for a face.
- Monster Cheese Balls: Roll cream cheese in chopped herbs, then stick on edible eyes or a sliver of red pepper for a “tongue.”
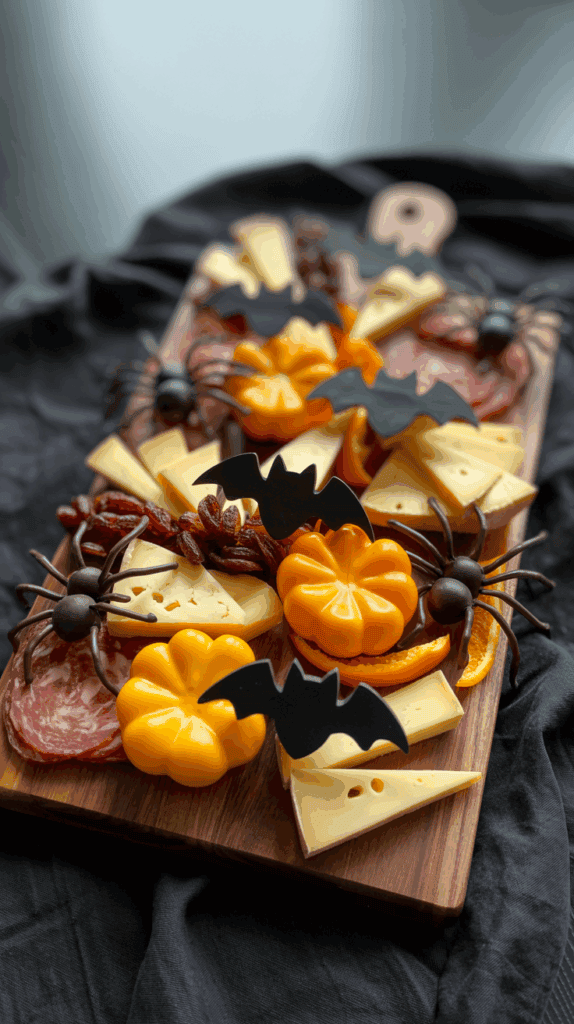
- Pumpkin Cheese Rounds: Use a round cutter and add little pretzel sticks or chives for the stem. Add a stripe of paprika for color.
For meats, the phrase “mummy meats” always makes my boys laugh! Thinly sliced salami or ham, wrapped or twisted, can become fun little monsters in no time.
- Mummy Roll-Ups: Wrap strips of prosciutto or turkey around breadsticks or string cheese, then tuck in an olive “eye.” These go fast!
- Salami Roses: Stack slices in a flower shape, but add a couple of “spider legs” with chives or pretzel sticks sticking out.
- Jack-o’-Lantern Pepperoni: Use pepperoni slices for orange color, layering with cheddar triangles to make cute pumpkin faces.
I like to fill gaps with mini pickles, marinated olives, or “witch finger” carrot sticks (trim the end and press on a sliced almond for a fingernail!). Everything feels more festive if you can give it a name and a giggle.
Sweet Surprises: Candy, Chocolate, and Fruity Haunts
No halloween themed charcuterie boards are complete without something sweet. This section is always a crowd-pleaser, especially with the kids (and okay, the grownups too!). I mix store-bought treats with a few homemade or “semi-homemade” goodies. Here’s what I love:
- Gummy Worm Piles: Tuck these next to cheese for pops of color, or make a little “graveyard” scene with crushed cookie dirt.
- Chocolate-Covered Pretzel Rods: Drizzle white and orange chocolate, then add spooky sprinkles or candy eyes. Let the kids help dunk—they’ll get messy but it’s worth it!
- Marshmallow Ghosts: Use marshmallows with icing dot eyes. They “haunt” the board and double as decor.
- Candy Corn and Pumpkin Mixes: I pour little piles into mini cupcake liners on the board. This helps the candy not roll everywhere and keeps things tidy.
- Eyeball Truffles: Round white truffles or donut holes with a bit of gel frosting for the pupil—a quick trick that always gets a laugh.
- Monster Apple Bites: Slice apples, sandwich with a little nut butter, and use mini marshmallows for “fangs.” Raisins or mini chocolate chips make great “eyes.” Kids go wild for these!
- Halloween Bark: Melt chocolate, pour onto wax paper, and sprinkle with cookies, pretzels, and candy eyeballs. Once it hardens, you can break it into pieces for the board.
Fruity options are great for balance. I’ll add clusters of grapes (they look like little eyeballs!), tangerine segments, or sliced kiwi for “monster skin.” It keeps the sugar rush under control and adds color.
Spooky Garnishes & Store-Bought Shortcuts
This last bit is pure magic for busy parents. You don’t have to spend hours in the kitchen to make halloween themed charcuterie boards look special. Spooky garnishes and clever store-bought shortcuts do half the work! I keep a little stash of these on hand during the whole month of October:
- Edible Candy Eyes: Stick them onto cheese cubes, cookies, or even a cluster of grapes. Instantly adds personality!
- Plastic Spiders and Themed Picks: Pop a few on the board for creepy charm (just remind little ones not to eat the plastic).
- Halloween Sprinkles: Use these on popcorn, cheese balls, or over chocolate bark for a playful look.
- Pre-Made Cookies & Brownie Bites: Arrange them along the edges and tuck in a few candy pumpkins for easy fillers.
- Olive “Spiders”: Slice black olives and place on crackers or cheese for a quick creepy touch.
- Pumpkin-Shaped Crackers: Nab them at the store and pair with cheddar slices for a themed bite.
If time is tight, grab these favorites and let the decorations do the work:
- Ghost or bat-shaped cheeses from the grocery deli (they usually pop up near Halloween!)
- Packs of Halloween-themed snack mixes or “spooky” popcorn
- Pre-cut fruit bowls
It’s all about combining a few homemade touches with easy add-ins. The result? A charcuterie board packed with flavor, color, and silly fun—without any stress. And the kids think I’m the coolest mom for “making monsters out of snacks!”
Kid-Friendly and Allergy-Safe Options
Making halloween themed charcuterie boards should be just as fun (and safe) for everyone at your party. As a mom with three kiddos—one who can’t have nuts—I’m always thinking about allergies and picky eaters. It’s amazing how many kids have food sensitivities these days. No one wants to see a child left out or feeling worried about what they can eat. I’m sharing some of my favorite nut-free, gluten-free, and dairy-free ideas, plus easy ways to let kids get hands-on with the snacks. When you plan ahead, every guest can join in, stress-free!
Nut-Free, Gluten-Free, and Dairy-Free Suggestions
Allergies don’t have to ruin the fun. I like to separate board sections with little cupcake liners, silicone cups, or themed napkins to help everyone spot their safe foods. Here’s how I make sure halloween themed charcuterie boards check all the boxes for nut-free, gluten-free, and dairy-free snacking.
Nut-Free Favorites
- String cheese (classic and safe)
- Rolled deli meats (turkey, ham, or roast beef—always a crowd-pleaser)
- Pretzel sticks made in nut-free facilities
- Popcorn (plain or lightly salted)
- Gummy candies—look for nut-free on the package
- Sliced veggies, like carrots and cucumbers, with hummus
Gluten-Free Staples
- Gluten-free crackers or rice crisps (sometimes I sneak in sweet potato chips for crunch)
- Sliced cheese, cubed or cut into shapes
- Fruit kabobs with grapes, berries, and orange segments
- Meat roll-ups—no bread needed!
- Roasted chickpeas (crispy and fun to eat)
- Licorice or fruit snacks labeled gluten-free
Dairy-Free Picks
- Meat and veggie roll-ups
- Guacamole cups with veggie dippers
- Marshmallows (most are dairy-free, but I double-check labels)
- Apple slices, grapes, and berries
- Dairy-free chocolate squares or Halloween candies
- Popcorn balls made with honey or syrup
Mix and Match with Confidence: I always put a little sign on the board or some cute note cards so parents know what’s safe for their child. If I’m not sure about a product, I skip it or keep it separate. Most stores now carry great allergy-friendly snack brands, so it’s not hard to fill out a whole board with something for everyone.
Kids love treats they can grab and eat in just a bite or two. If you have time, shape fruits and cheese with mini cookie cutters, or use fun Halloween picks to mark safe spots. Trust me, nothing makes a child’s night more than seeing a snack with their name on it and knowing it’s okay to eat!
How to Get Kids Involved in the Fun

Kids get so excited when they can help set up the snack table. Getting them involved with halloween themed charcuterie boards doesn’t just keep little hands busy, it also gives them a sense of pride. Plus, the more your kids help, the more likely they are to actually eat those carrot sticks and apple slices. I say, let the chaos begin (with a little supervision)!
Here’s how I like to turn snack-time into playtime:
Setup Helpers
- Let each child pick out a treat at the store. My boys fight over which bag of gummy teeth or ghost crackers to buy!
- Put kids in charge of platters and bowls. Even toddlers can help line platters with spooky napkins.
- Give everyone clean hands and a job—stack the crackers, fill cupcake liners, or sprinkle candy decorations.
Snack Decorating
- Use small tongs or toothpicks for stacking cheese and meats. Kids love making monster faces with olives and pickles.
- Challenge them to build “fruit kabob monsters” with grapes, berries, and chunks of tangerine.
- Set out bowls of edible eyes or sprinkles so kids can create their own “creepy creatures” from marshmallows or fruit.
Personal Snack Boards
- If you have a bigger group or want to avoid sharing germs, let kids build their own mini boards or snack cups. Fill muffin tins or small plates with different options and watch the creativity explode!
Safe Fun for All Ages
- Offer plenty of allergy-friendly choices (as listed above), and help younger kids spot the foods they can have.
- Invite kids to create labels for their safe snacks—colored sticky notes or tiny flags are always a hit.
- Keep a damp cloth nearby (it gets messy fast!) and just let go of perfect photo ops. The best memories are the silly, sticky ones.
When my boys are elbow-deep in grapes and giggling over their lopsided cheese ghosts, I know we’ve made Halloween extra special. Kids remember when they feel included, and halloween themed charcuterie boards are one big invitation for every child to join in the spooky fun. If you’re ready for a little happy chaos, let the kids take the lead!
Bringing It All Together: Display, Serve, and Enjoy!
The true magic of halloween themed charcuterie boards happens when you bring it all together for your family and guests. After all that planning, picking, and prepping, now is your time to play! I love seeing my boys’ faces light up when the finished board lands on the table. All those silly snacks and spooky touches turn snack time into a moment everyone remembers. With a few presentation hacks and serving tips, you’ll have your crowd munching, laughing, and probably snapping photos before you know it.
Setting Up Your Halloween Display
The presentation sets the mood and amps up the excitement. Kids, friends, and even grandparents will be drawn to a festive board that looks like it burst out of a Halloween storybook. You don’t need to spend a fortune or be a professional party planner to wow your crew.
Try these easy ideas to set the stage:
- Lay your board in the center of a decorated table for a natural gathering spot.
- Drape orange, black, or purple fabric underneath, or use a spiderweb tablecloth for extra flair.
- Surround the board with mini pumpkins, battery-powered candles, or a few scattered leaves.
- Add height with cake stands or overturned bowls; stack part of the board or side treats higher for a dramatic look.
- Place Halloween cups or themed plates within easy reach, so guests aren’t searching for ways to dig in.
For my family, the board is just the beginning. We add in cauldrons of punch, silly straw cups, and maybe a few “dancing skeleton” napkins. The point is to make it feel playful and inviting—no one can resist!
Keeping Snacks Fresh and Safe
Halloween nights can get busy and a little wild, so I always think ahead when it comes to keeping food fresh. Nothing spoils the fun faster than soggy crackers or snacks that lose their crunch before the party starts.
I use these practical tricks:
- Wait to lay out crackers, pretzels, or bread until just before serving to keep them crisp.
- Keep cold foods like cheese and fruit on a chilled tray or over a layer of ice packs, covered with a napkin.
- If setting up outside, use mesh food covers or domes to keep the bugs away from all the treats.
- For longer parties, refill the board in small batches. Tuck extras in the fridge and swap out as needed.
- Separate wet snacks (like pickle slices or fresh fruit) from dry items with cupcake wrappers or silicone cups.
For the kids, I make sure candies and little hand-grab items are easy to reach and monitor, which helps everyone eat what’s safe and fun for them.
Serving Up Smiles: Little Touches That Make It Special
When guests arrive, the board already feels like an activity! Everyone circles around, kids compare marshmallow ghosts, and someone always tries to build the goofiest monster stack. Here’s how I keep it stress-free and extra joyful:
- Add small tongs, toothpicks with cute toppers, or fun Halloween picks for grabbing snacks.
- Place “monster cups” or mini plates around the table so little ones can build their own mini masterpiece.
- Tuck in tiny cards with the names of creative snacks—my boys love spotting “Witch’s Fingers” or “Zombie Eyes.”
- Encourage a little friendly competition. Who can make the funniest apple monster?
- If you have a crowd, set up a few smaller boards around the party space so everyone gets a turn.
Watching everyone dig in is my favorite part. The colors pop, the flavors mix, and everyone finds something new they want to try. It’s not just about eating—it’s about the shared moment, the giggles, and maybe a little snack trading under the table.
Tips for Quick Cleanup
After the fun, I know cleanup is the last thing anyone wants to tackle. Charcuterie boards actually make it simple (I call this a Halloween miracle). Here’s how I make it as easy as possible:
- Use parchment paper, napkins, or disposable tablecloths under the board for fast table wipe-down.
- Set out an extra bowl or tray for used picks and small trash, so everything stays tidy.
- Store leftovers in plastic storage containers with labels—let the kids help and make “spooky snack boxes” for tomorrow.
- Rinse the board right away, even if you’re tired; dried-on cheese is a nightmare to scrub.
The best treat at the end? Most of the serving pieces are reusable, and with all those bite-sized snacks, there are rarely big messes to tackle.
Pulling everything together is where all your colorful snacks, silly treats, and creative ideas shine. After the prep is done, relax and watch everyone experience the magic. Your halloween themed charcuterie boards aren’t just food—they become a holiday memory your family will want to recreate year after year!
Conclusion
Halloween themed charcuterie boards prove that a little creativity goes a long way, especially when you’re in the thick of family chaos. These boards make it easy for anyone to pull together something festive without spending hours in the kitchen. Whether you have toddlers covered in chocolate or grown-up goblins reaching for the last mummy wrap, everyone leaves the table smiling.
I love seeing my boys jump in, building monster faces and sneaking candy (when they think I’m not looking). The fun isn’t just in the snacks. It’s in the laughter, the mess, and the memories you build together.
If you’re looking for a new family tradition that is stress-free and full of joy, give halloween themed charcuterie boards a try this year. I hope your table is filled with treats, giggles, and just the right amount of spooky magic! Thank you for reading, and please share your best snack board stories or photos—I’d love to see what your crew comes up with!