This post may contain affiliate links. Read the full disclosure here.
By the time February rolls around, my house is a mix of Legos, snack crumbs, and three wild little boys who think every throw pillow is a weapon. I still crave that soft, cozy Valentine vibe, but our budget is tight, so I’ve learned how to pull together cheap valentine’s day decorations that look like I spent way more than I did. I love grabbing a few simple things from Dollar Tree or Walmart, then mixing them with what I already have, so the house feels sweet and special without blowing our grocery money!
In this post, I’m sharing the easy ideas that actually work in a busy, kid-filled home. Think quick projects the boys can help with, decor that holds up to sticky fingers, and simple swaps that make your space feel warm and a little bit fancy. If you want pretty, high-end style on a real-life budget, you’re in the right place!

- Start With A Simple Color Plan So Cheap Decor Looks High End
- Pick 2–3 Valentine Colors And Use Them Everywhere
- Mix Textures Like A Designer (Without Designer Prices)
- Repeat The Same Few Elements In Every Room
- Dollar Store And Thrift Store Valentine Finds That Look Luxe
- Transform Plain Glass And Jars Into Chic Candle Holders
- Dress Up Basic Vases And Bottles With Ribbon And Leftover Fabric
- Make Cheap Garlands Look Boutique With Layering
- Turn Random Thrift Store Finds Into Valentine Decor
- Easy DIY Valentine’s Day Decorations To Make With Kids
- Paper Heart Banners And Wall Art Kids Can Actually Help With
- DIY Valentine Centerpieces With Candy, Toys, And Things We Already Own
- Handmade Pillows And Throws Without Sewing Skills
- Decorating Key Spots In Your Home So It Feels Festive On A Budget
- Create A Simple Valentine Mantle Or Shelf As Your Main Focus
- Turn The Kitchen Table Into A Sweet Valentine Breakfast Spot
- Add Tiny Valentine Touches In Kids’ Rooms And The Entryway
- Money Saving Tips So Your Valentine Decor Stays Budget Friendly Every Year
- Shop Your House First And Reuse Everyday Items
- Store Small And Smart So You Can Reuse Decor Next Year
- Plan Ahead With After Holiday Sales And Simple Staples
- Conclusion
Start With A Simple Color Plan So Cheap Decor Looks High End

When I decorate for Valentine’s Day with my boys running circles around me, I keep one rule in mind: a simple color plan can make even the cheapest cheap valentine’s day decorations look pulled together and fancy. If the colors feel calm and repeated, everything looks like it belongs together, even if it came from the dollar aisle.
I like to think of color as the “glue” that holds all the random pieces in place. Once I pick a small set of colors, it’s so much easier to shop, DIY, and style every room without feeling overwhelmed.
Pick 2–3 Valentine Colors And Use Them Everywhere

I always start by choosing just 2 or 3 colors for the whole house. Not 10. Not every shade on the shelf. Just a tiny “team” of colors that will show up in every corner.
This simple limit is what makes cheap items look like a set instead of a mess. When the same colors repeat, your eye stops noticing the price tag and starts seeing a coordinated look.
Here are a few color palettes I love:
- Blush pink, white, and gold
Soft, pretty, and a little glam. I use:- Blush pillow covers or a throw blanket
- White candles or plates I already own
- Gold picture frames, chargers, or a thrifted brass vase
- Red, white, and kraft brown
This one feels cozy and a bit rustic. I pull in:- Red hearts, napkins, or a table runner
- Plain white dishes or mugs
- Mauve, cream, and black
Slightly moodier and more grown-up, but still sweet:- Mauve or dusty rose flowers
- Cream candles or throw pillows
- Black picture frames or candle holders for contrast
To keep things practical, I always start with what I already own. I look at:
- The color of our couch and main pillows.
- Our rug and any visible blankets.
- The dishes and mugs we actually use.
For example, my couch is gray, and my everyday dishes are white. So blush pink, white, and gold fit right in. If you have a brown leather couch, that red, white, and kraft brown combo will look amazing and very warm.
Once I pick the palette, I try to stick to it in every space I touch:
- The mantle
- The kitchen table
- The entryway
- Even the kids’ snack tray
If something doesn’t fit the colors, I either skip it or tuck it away. That tiny bit of discipline is what makes dollar-store hearts and paper banners look like they came from a cute boutique.
Mix Textures Like A Designer (Without Designer Prices)

Color is the first step. Texture is what makes it look rich and layered, without buying expensive decor.
Texture just means how something feels or looks like it would feel:
- Shiny: glass, foil, metal, satin ribbon
- Soft: fabric, yarn, felt, knit blankets
- Rough: jute, burlap, kraft paper, wood
When you mix a few different textures in the same color palette, your decor suddenly looks more interesting and “expensive,” even if everything cost a few dollars.
Here are some easy texture combos I use:
- Thrifted glass vase + burlap ribbon + paper hearts
I wrap a simple glass vase with a strip of burlap or jute ribbon, then tuck in a kraft paper tag or hang little paper hearts on string. The glass looks shiny, the burlap looks rough, and the paper is smooth and simple. Cheap, but not boring. - Foil balloons + knit pillows + wooden beads
My boys love balloons, so I let them pick a couple of heart balloons, then I balance that shiny chaos with soft pillows and a strand of wooden bead garland.
With little boys, I also have to think about what can survive tackling, jumping, and sticky jelly fingers. Kid-proof texture options I reach for:
- Felt hearts instead of glass ornaments
- Paper garlands taped higher up where they can’t reach
- Plastic or metal trays for snacks and crafts
- Washable pillow covers and blankets that can go straight in the wash
I skip anything super fragile on low surfaces. If it can break or stain, it goes up high or stays in the box. Texture should work for your family, not stress you out.
Repeat The Same Few Elements In Every Room

Once my colors and textures are set, I repeat the same shapes and patterns all over the house. This simple repetition is what makes everything feel high end, even when half of it is homemade.
I usually pick:
- One main icon
- One pattern
Then I sprinkle them everywhere.
Some easy combos:
- Icon: Hearts | Pattern: Stripes
- Heart-shaped bowl for candy on the counter
- Simple striped dish towel in the kitchen
- Heart pillow on the couch
- Striped ribbon on a vase or around a candle
- Icon: XOXO | Pattern: Polka dots
- Polka dot napkins on the table
- A tiny framed “XOXO” print on the entry table
- White mug with dot stickers to fake a polka dot look
- Icon: Cupid arrows | Pattern: Gingham
- Red and white gingham runner on the table
- Little arrow picks in cupcakes
- Gingham ribbon tied around a vase or lantern
Here is what this looks like in real life at my house:
- In the living room, I might have a heart pillow, a glass vase with a gingham ribbon, and a small “XOXO” sign.
By repeating the same ribbon, heart shape, or word in a few spots, your eye connects everything. Your brain says, “Oh, this all goes together,” even if you know you grabbed half of it at Dollar Tree.
The best part is that once you pick your color palette, textures, and a few repeating elements, decorating becomes much faster. You’ll know right away if something fits or not, and you can enjoy that sweet, pulled-together Valentine look without spending designer money.
Dollar Store And Thrift Store Valentine Finds That Look Luxe

I love taking simple dollar store finds and turning them into cheap valentine’s day decorations that look like they came from a fancy boutique. With three boys running around, I need projects that are quick, budget-friendly, and sturdy enough to handle Nerf battles. A little paint, ribbon, and creativity can stretch those small buys into decor that feels soft, romantic, and fun without costing a fortune.
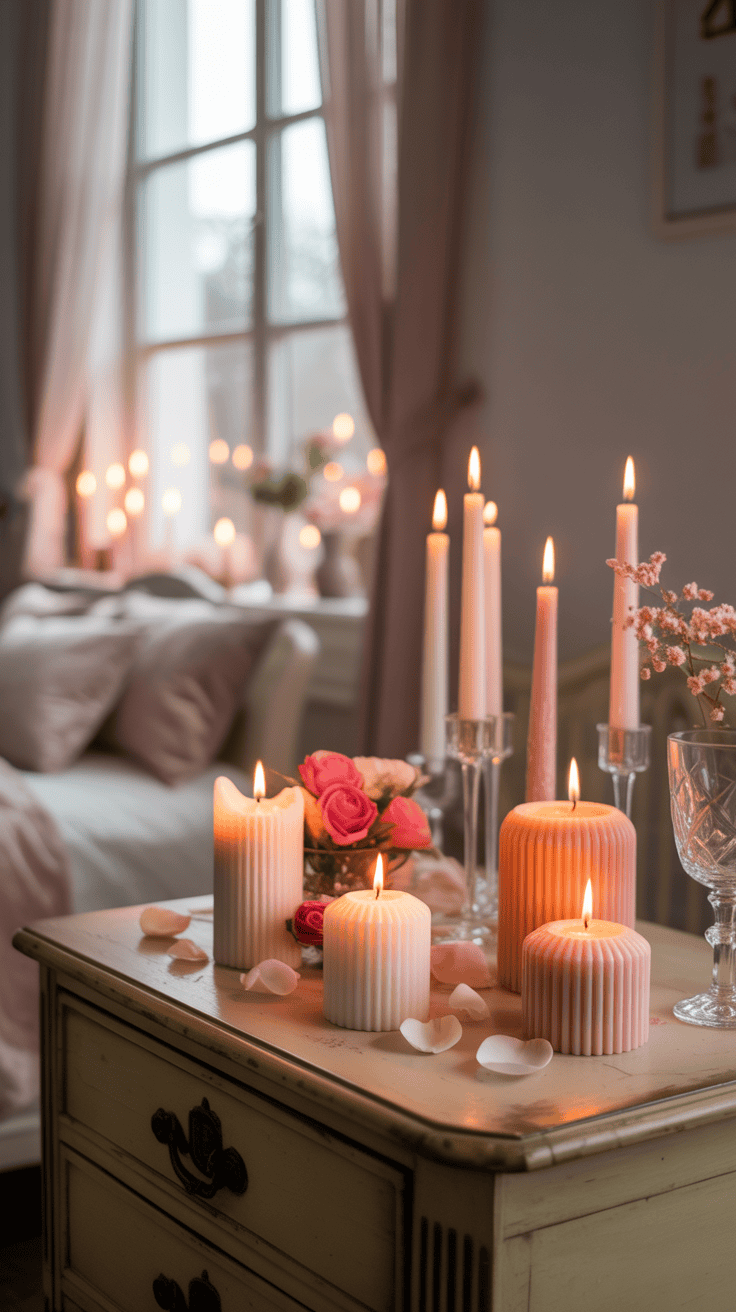
Transform Plain Glass And Jars Into Chic Candle Holders

One of my easiest tricks is saving every glass jar that comes through my kitchen. Pasta sauce jars, salsa jars, small yogurt jars, all of it goes in a box in the pantry. Then I mix those with dollar store glass candle holders to create pretty “sets” that look high end.
Here is how I dress them up so they look chic, not like trash night:
- I wash the jars well and remove labels with hot water and soap.
- I lightly scuff the outside with a scrub pad if I plan to paint.
- I use matte white, blush, or soft gold spray paint for a calm, pretty look.
- For a more luxe feel, I tap on a bit of faux gold leaf around the rim or base.
If I do not feel like painting, I still upgrade them with simple layers:
- Wrap the neck with twine or jute for a rustic, cozy feel.
- Tie on a strip of lace ribbon for a soft romantic touch.
- Add a tiny paper tag with a heart or “XO” written in marker.
For moms, safety is everything. Real candles and little kids do not mix well in my house. I almost always use battery-operated tea lights inside the jars. They still give that soft glow, but I do not panic if a soccer ball flies through the room.
A few safety habits I keep:
- If I do use real candles, I keep them high up, never on the coffee table.
- I avoid tall candles in wobbly jars.
- I teach the boys that candles are “look only, no touch.”
Once the jars are ready, I tuck them all over the house:
- On the kitchen counter, grouped on a tray with a small vase of flowers.
- On bathroom shelves, paired with rolled white washcloths for a spa-like feel.
That tiny bit of glow makes our busy house feel calm for at least five minutes, which honestly feels like a vacation.
Dress Up Basic Vases And Bottles With Ribbon And Leftover Fabric
Old bottles and thrifted vases are my secret weapon. They are usually under a dollar, and once I dress them up, they look like something from a fancy home store.
I start with whatever I have:
- Empty wine or glass drink bottles
- Mason jars
- Simple clear vases from the thrift store
Then I pull out my stash of ribbon and fabric scraps. I like to use:
- Satin ribbon for a smooth, romantic vibe
- Velvet ribbon for a richer, cozy look
- Grosgrain ribbon for a simple, classic style
All in Valentine colors like blush, red, cream, or soft mauve.
Some of my favorite quick ideas:
- Tie a simple bow around the neck of the vase, then trim the ends at an angle.
- Wrap a band of scrap fabric around the center and secure it in the back with hot glue or tape.
- Add a small heart charm or wooden heart to the bow for a sweet detail.
Once the outside looks cute, I fill them with easy, low-stress options:
- Grocery store flowers, even a $5 bunch looks fancy in a dressed-up vase.
- DIY paper hearts on sticks (I let the boys cut hearts and tape them to skewers).
- Bare branches from the yard sprayed white or light pink, which looks wintery and soft.
I group three or five bottles together on a tray or shelf. Different heights and shapes keep it interesting so it looks styled, not cluttered. The boys like to “help” by deciding where each bottle goes, which keeps them involved and a little less likely to tip everything over.
Make Cheap Garlands Look Boutique With Layering

Garlands can look a little flat and sad when they hang by themselves. The trick I use is simple, I layer them so they look full and intentional.
I start with a basic garland:
- Paper heart garlands from the dollar store
- Simple felt hearts on string
- DIY hearts punched from cardstock and sewn or taped onto twine
Then I pair that plain garland with something that has more texture or light:
- A strand of fairy lights
- A simple greenery garland I use for different seasons
- A strand of wooden beads or soft pom poms
When I hang them, I do not keep everything in a straight line. I let one garland drape lower, then tuck the second one a bit higher. Even two thin garlands together look pretty and full.
My favorite spots to hang them:
- Across the mantle, layered with candles and framed photos.
- On stair rails, where the kids can see them but not pull them as easily.
- Over the kids’ art area, with their heart drawings taped underneath.
If the base garland is very cheap, like thin paper hearts, I always add one nicer element. That might be a wood bead strand, a faux eucalyptus garland, or a soft yarn pom garland. That one better-quality piece makes the whole group look special, even if everything else cost one dollar.
To keep things mom-friendly, I use clear command hooks or painter’s tape so I am not repairing walls later. When Valentine’s Day is over, I take the hearts off and keep the lights and greenery for the next season.
Turn Random Thrift Store Finds Into Valentine Decor

Thrift stores are my happy place. I walk in and head straight for a few key sections because they are full of things that flip easily into Valentine decor.
I keep an eye out for:
- Picture frames, any size, any color
- Small mirrors
- Trays, wood, metal, or plastic
- Candlesticks, especially wood or brass
Most of the time, they just need fresh color. I like to use:
- Blush pink for a soft romantic touch
- White for a clean, classic look
- Soft gold for a little glam
Here are a few quick projects a busy mom can do during nap time.
1. Easy Valentine tray
- Grab a wooden or sturdy plastic tray.
- Wipe it down.
- Paint it white or blush.
- Let it dry, then add a small “XO” or heart in one corner if you want.
I use mine as a tiny hot cocoa station. I set out mugs, a jar of marshmallows, and a little bowl of heart sprinkles. The boys think it is the fanciest thing in the world.
2. Fast framed heart art
- Take a thrifted frame and remove the glass.
- Cut a piece of scrapbook paper or kraft paper to fit.
- Cut a simple heart from contrasting paper or fabric.
- Glue the heart in the center and pop it in the frame.
You can make a whole mini gallery wall like this in under an hour. Different frames, same simple heart idea, it ties everything together.
3. Updated candlesticks
- Find a few candlesticks, they do not have to match.
- Paint them all the same soft color.
- Use them with battery candles on shelves or mantles.
Grouped together, they look collected and high-end, not like thrift store leftovers.
I love that all of these ideas are simple enough to pull off between snack refills and bedtime stories. A little paint, a few ribbons, and some smart layering can turn the most random dollar store and thrift store finds into cozy, luxe-looking Valentine decor that fits right into real family life.
Easy DIY Valentine’s Day Decorations To Make With Kids

My boys love to “help” with decorating, so I try to pick projects that are cheap, fast, and actually kid-friendly. These easy ideas pull in color, texture, and heart shapes so the whole house feels sweet and special, and they fit right in with the rest of my cheap valentine’s day decorations without looking kiddie or messy.
Paper Heart Banners And Wall Art Kids Can Actually Help With
Paper is my best friend for Valentine’s Day with kids. It is cheap, light, and if someone wipes peanut butter on it, I can toss it and not cry.
For heart banners, I pull out:
- Construction paper
- Scrapbook paper
- Recycled brown paper bags
I love mixing all three. The scrapbook paper adds pattern, the construction paper gives solid color, and the brown paper bags make it look a little more “designer” and less like a classroom.
Here is how we make our banners:
- Cut the hearts
My older son helps cut the hearts out with kid scissors. If you have a heart-shaped paper punch, this step is even faster and really fun for bigger kids. - Punch holes
We punch one hole on each side of the top of the heart. Older kids can handle this part, younger kids can hand you the hearts and “inspect” them.
We hang these banners:
- Across the mantle
- On the kitchen window
- Over the entry table
Brown paper bag hearts look surprisingly high-end when you mix them with soft pink or white hearts. I sometimes write tiny words on a few, like “XO” or each kid’s name.
For wall art, I try to use what we already have. If the boys painted a wild abstract picture last week, I do not toss it. I turn it into art that actually looks modern.
Here is my simple process:
- I save their painted pages, even the “scribble” ones.
- I flip the painting over, trace heart shapes on the back, then cut them out.
- I grab a plain white piece of cardstock and glue a few hearts in a grid or scattered pattern.
- I pop the finished sheet into a simple frame, usually black, white, or gold.
You can use cheap frames from the dollar store or thrift store. Once their colorful hearts are framed, it looks like something you would buy on Etsy. My boys get so proud when they see their “art show” on the wall, and guests always comment on it.
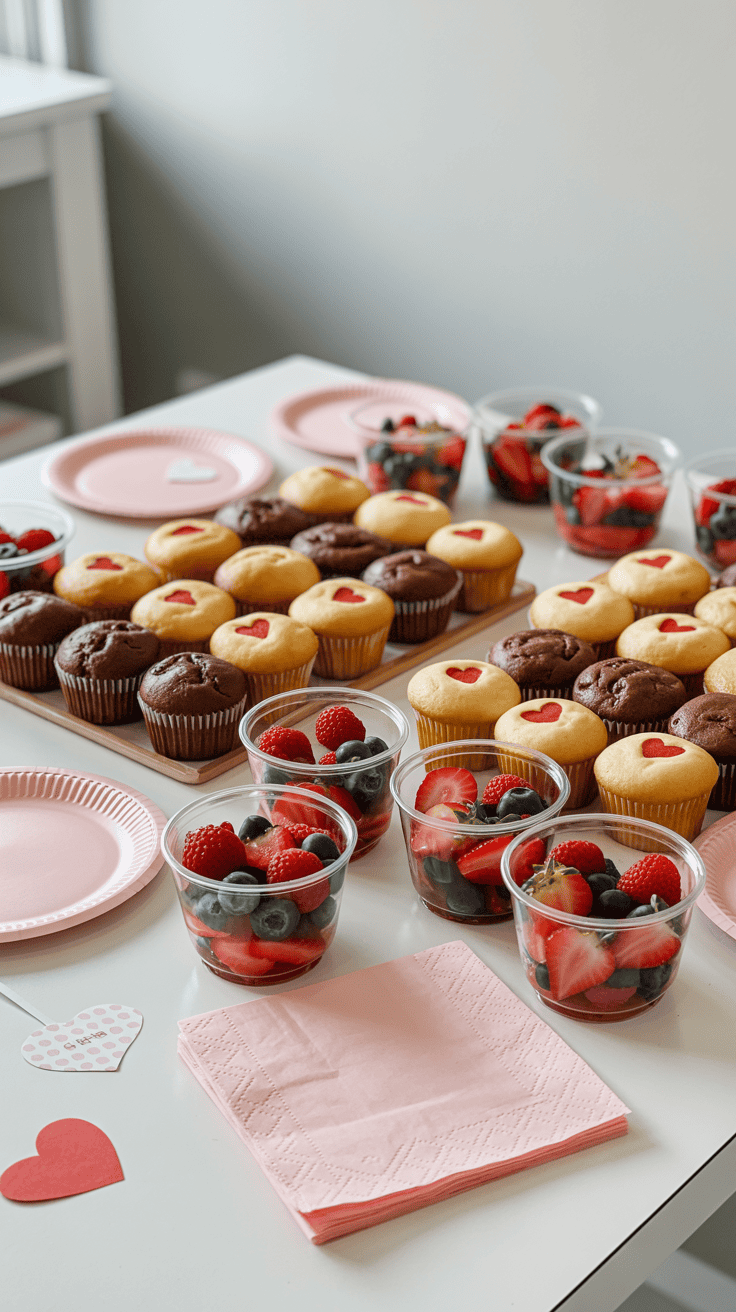
DIY Valentine Centerpieces With Candy, Toys, And Things We Already Own

Centerpieces can feel fancy without being fussy. I like to use stuff we already own so the boys feel like it is part of their world, not a “do not touch” display.
My favorite base is clear jars or vases. Mason jars, pasta sauce jars, tall vases from the thrift store, all of it works. We fill them with fun, kid-approved stuff:
- Red and pink candy
- Mini toy cars
- LEGO bricks in Valentine colors
Then we tuck in paper hearts on skewers or paper straws. The boys help with each step:
- They sort Legos or cars by color.
- They help pour candy into the jars.
- They tape paper hearts onto skewers and “plant” them in the jars like flowers.
A few easy centerpiece ideas that look pretty for guests:
- Candy “bouquet” jar: Fill a tall vase with wrapped candy, then add paper hearts on skewers. Tie a ribbon around the vase and set it on a tray with a few tealight candles. It looks fancy, but it is just candy and paper.
- Toy car parade: Line up toy cars in the center of the table, then park a small jar of Legos every few cars. Stick heart-topped skewers in the Legos so it looks like a tiny Valentine city. Kids love this one.
- LEGO heart vase: Let the kids build a square “vase” out of Legos. Set a small cup or jar inside and fill it with paper hearts or fake flowers. It looks colorful and intentional, not just like a Lego explosion.
I usually give the boys a clear job. I will say, “You are in charge of the red Legos,” or “You get to place every single car.” That little bit of responsibility makes them so proud. When we sit down to dinner, they always announce, “We built the table!”
The key for keeping it pretty is to limit colors. I stick to red, pink, white, and maybe one accent, like gold or kraft brown. Then even the toys look styled instead of chaotic.
Handmade Pillows And Throws Without Sewing Skills
I love the idea of Valentine pillows, but I do not want to store heart pillows all year. So I focus on temporary, no-sew updates that come off in March.
My favorite supplies:
- Iron-on patches
- Fabric glue
- Felt sheets
- Safety pins
For pillows, I start with pillow covers I already have or cheap ones from IKEA, Amazon, or the thrift store.
A few simple ideas:
- Iron-on hearts: Cut hearts from fabric or buy pre-made iron-on patches. I place a few in one corner of the pillow cover, then follow the iron-on instructions. Instant Valentine look, no sewing.
- Felt heart “appliqués” with fabric glue: Cut hearts from felt in different sizes. Glue them to the pillow cover in a cluster or in a simple row. Use washable fabric glue if you want them to last the whole month.
- Safety-pinned felt shapes: For a totally temporary look, cut felt hearts and pin them at the corners with small safety pins from the back. They stay put, but you can pull them off in seconds after Valentine’s Day.
For throws and blankets, I like to work with thrifted finds or ones we already snuggle with on the couch.
Easy no-commitment ideas:
- Ribbon “wrap”: Wrap a soft throw with a wide satin ribbon in red or blush, like a gift. Tie a bow on one corner and tuck in a felt heart. It looks sweet for photos, but you can unwrap it anytime.
- Clip-on hearts: Use small clothespins or clip-on ornaments to attach felt or paper hearts along the edge of a blanket. Kids love helping clip them, and you can store the hearts in a bag for next year.
- Temporary fabric tape shapes: Use fabric tape or gentle double-sided tape to attach cut-out hearts near the corners. This works well on decorative throws that are more for looks than heavy use.
The best part is that none of this is permanent. When July hits and my boys are using the pillows as stepping stones in some wild game, I can pull off every heart and we are back to neutral.
These little fabric tweaks, mixed with the paper projects and kid-built centerpieces, make the house feel so cozy and festive. And I am not stuck with bins of seasonal pillows and fragile decor that I have to hide from three busy boys.
Decorating Key Spots In Your Home So It Feels Festive On A Budget

When I decorate for Valentine’s Day, I pick a few key spots and pour my effort there so my cheap valentine’s day decorations still look pulled together and special. I do not cover every surface. I just choose a few “hero” areas that make the whole house feel festive when the kids wake up and when guests walk in.
For our house, that usually means a main shelf or mantle, the kitchen table, the kids’ rooms, and the entryway. Once those spots look sweet and cozy, everything else feels done, even if the rest of the house is covered in toy cars and snack crumbs.
Create A Simple Valentine Mantle Or Shelf As Your Main Focus

I like to pick one spot as the main Valentine zone. For us, it is usually the mantle, but it could be a bookshelf, a piano top, or even a dresser in the dining room. This becomes the “stage” for all the love-day magic and the backdrop for our kid pictures on Valentine morning.
To keep it simple, I follow a basic formula that always works:
- One large item in the center
This is the main anchor. I use:- A framed Valentine print
- A bigger sign that says “Love” or “XOXO”
- A chunky mirror with a heart garland across it
- Two medium items on the sides
These balance the middle so it does not look lonely.
A few ideas:- Matching or similar candles in simple holders
- Two small vases with flowers or paper hearts
- A stack of books with a heart on top
- Smaller fillers tucked in the gaps
This is where I add personality:- A couple of family photos, especially from past Valentine’s Days
- A tiny bowl of candy hearts
- A small ceramic house, bird, or thrifted figurine
I almost always drape a garland across the front. It pulls everything together and hides a lot of visual chaos. Mine might be:
- A felt heart garland
- Wood beads with one or two hearts clipped on
I keep the color palette tight, usually just red, pink, and white, or blush, white, and gold. That small limit makes even dollar store pieces look like a set.
This main Valentine shelf becomes our little memory spot. On Valentine morning, the boys stand in front of it in their pajamas, holding their little treat bags. I snap a quick picture before the chaos starts, and that mantle ties every photo together year after year.
Turn The Kitchen Table Into A Sweet Valentine Breakfast Spot
The kitchen table is where most of our day happens, so I like to turn it into a simple Valentine breakfast zone. It looks fancy to the kids, but I mostly use things we already own.
I start with neutral basics:
- Plain white dishes
- Clear glasses or mason jars
- Everyday silverware
Then I add a few easy layers.
For the base, I use something long and soft down the center:
- A pink or red table runner
- A folded throw blanket
- A long strip of fabric or even wrapping paper
If you do not own anything pink, a neutral runner with a few red napkins still looks festive.
Next, I add a cheap centerpiece that can survive juice spills:
- A clear vase or jar with grocery store flowers
- A jar filled with strawberries and a few paper hearts on skewers
- A small tray with a candle, a mini plant, and a bowl of candy
Then I bring in the fun little touches that kids love:
- Heart napkins from the dollar store or folded paper towels with a heart sticker
- Simple printable place cards with each kid’s name and a heart doodle
- Paper hearts scattered down the middle like confetti
If I do not want loose pieces on the table, I tape the hearts flat so tiny hands cannot throw them like snow.
Breakfast itself does not have to be fancy to feel special. A few easy ideas that my boys go crazy for:
- Strawberries cut into heart slices
- Toast with jam in a rough heart shape on top
I keep the menu simple, but I serve it all on that “fancy” table. The boys walk in and say, “Whoa, is it a party?” every single time, even when it is just pancakes and milk.
The best part is that once breakfast is over, I can clear off the food and still leave the runner, centerpiece, and a few hearts. The table stays cute for the rest of the day without getting in the way of homework and snacks.
Add Tiny Valentine Touches In Kids’ Rooms And The Entryway
Little touches in the kids’ rooms and the entryway make the whole house feel festive without adding clutter. I keep it light and simple, just enough for them to feel the excitement when they wake up and when we walk in the door.
In the kids’ rooms, I focus on things that do not break and can come down easily:
- Paper hearts on bedroom doors
I cut a handful of hearts from red and pink paper, then tape them to each child’s door after they fall asleep. Sometimes I write sweet notes on a few, like “You are kind” or “You are brave.” They wake up to a little love wall, and it sets such a happy tone. - Small heart garland above the bed
I hang a tiny garland on the headboard or on the wall above the bed. Felt hearts, paper hearts, or even painted clothespins holding mini photos work well. I attach it with painter’s tape or removable hooks so it does not damage the wall. - Tiny framed “love” print on the nightstand
I grab a small frame we already own, print or handwrite the word “love,” and pop it inside. It takes five minutes, but it feels thoughtful. You can also use a photo of you and your child for that frame, which they absolutely love.
In the entryway, I add a few touches that say “Valentine’s Day lives here” the second you walk in:
- A small Valentine wreath on the front door or on a hook
It can be as simple as a plain green wreath with one ribbon in red or pink tied on the side. - A bowl of conversation hearts or wrapped candy
I set this on a little table or shelf by the door. The boys know it is mostly for looks, but they sometimes get one piece when they come home from school. - A simple sign by the front door
Something like “Love lives here” or “Be kind” written on a chalkboard, a letter board, or a printable in a thrifted frame. It sets such a sweet tone as we come and go all day.
None of these little touches take much time, and they do not add a lot of stuff to store later. I pack the paper hearts flat in a folder, keep the tiny prints in a zip bag, and use the same frames and bowls again next year.
By focusing on one main shelf, a fun breakfast table, and a few tiny surprises in the kids’ rooms and entryway, the whole house feels festive and cozy without a big budget or a big mess.
Money Saving Tips So Your Valentine Decor Stays Budget Friendly Every Year

I want my house to feel sweet and cozy every February, but I also want our budget to survive, so I lean hard on habits that make my cheap valentine’s day decorations stretch year after year. A few simple tricks help me reuse what I already own, keep things stored without breaking, and grab smart deals instead of panic buying on February 12th.
These are the little money-saving routines that have made the biggest difference for me as a busy mom with three wild boys and not a lot of storage space.
Shop Your House First And Reuse Everyday Items
Before I even think about going to Target or Dollar Tree, I walk around my house with fresh Valentine eyes. Half the time, the “new” decor I want is already hiding on a shelf or in a cabinet.
I look for anything in Valentine colors or soft, cozy textures:
- Red: books, toys, bowls, mugs, blankets
- White: pitchers, plates, vases, candles
- Glass: jars, bottles, candle holders
I pull these into one spot on the kitchen table. It feels like shopping, but everything is free.
A few things I grab almost every year:
- Red cookbooks or kids’ books, stacked to add height on a shelf
- White pitchers or mixing bowls, used as vases for grocery flowers
- Clear glass jars, filled with candy, crayons, or paper hearts
One year I was rushing to decorate our living room shelf before family came over. I did not have anything left in the decor bin, so I grabbed the boys’ LEGO blocks in red and white. I poured them into a glass jar, stuck a few paper hearts on wooden skewers, and popped it on the shelf. It looked so fun and playful, and my boys were thrilled that “their stuff” was part of the decor.
Since then, I always look at toys as possible decor:
- Red and pink building blocks in jars
- Stuffed animals that feel on-theme, like bears holding hearts
- Little red cars lined up on a tray with a few paper hearts
Styling what we already own is honestly the cheapest hack ever. It also tends to look more natural, because those pieces already work with your home.
A few simple ideas if you feel stuck:
- Color-sort your shelves: Pull all red and white books together on one shelf, then add a tiny heart or candle.
- Dress up your dishes: Use your everyday white plates, then add a red napkin and a simple paper heart on top.
- Rework your textiles: Fold a red or pink throw at the end of the bed or couch, then add one neutral pillow with a tiny heart accent.
Once I “shop” my house like this, I usually find I only need a couple of small, cheap items to finish things off.
Store Small And Smart So You Can Reuse Decor Next Year
Reusing decor only works if you can actually find it next year. I learned that the hard way while digging through a mountain of random holiday boxes at 11 pm, trying to remember where I put the felt hearts.
Now I keep my Valentine stuff small, labeled, and easy to grab.
Here is what works well for me:
- Clear storage bins: I use one medium clear bin for all Valentine decor, so I can see what is inside without opening it.
- Simple labels: I stick a label on the front that says “Valentine” and add a short list like “hearts, garlands, kids’ crafts” so I remember what is in there.
- Zipper bags for garlands: I slide each garland into its own gallon zipper bag. No more tangled string, and tiny pieces do not fall off.
For breakable items, I do not buy fancy storage. I use what we already have:
- Old shoe boxes for glass jars and candles
- Scraps of tissue paper or old gift bags to wrap fragile pieces
- Those shoe boxes go inside the main clear bin for an extra layer of protection
I also like to sort by color and theme, because it lets my decor work harder for me throughout the year.
Here is how I think about it:
- Red items: hearts, beads, napkins, ribbon
- I use these for Christmas, birthdays, and the Fourth of July too.
- White and neutral items: candles, bead garlands, frames
- These live with my “everyday” decor so they stay out year-round.
- Very specific Valentine items: “XOXO” signs, heart-shaped plates
- These stay in the Valentine bin only.
If I am packing things away late at night, I keep my process very simple:
- Grab the clear bin and set it near where decor is coming down.
- Add zipper bags with garlands.
- Tuck shoe boxes with breakables on top.
- Toss in one small envelope or folder with the kids’ best art from that year.
The next year, I open the bin and have a tiny time capsule of what worked, what I loved, and what I can skip. No more rebuying the same pack of heart napkins because I could not find last year’s.
Plan Ahead With After Holiday Sales And Simple Staples
One of my favorite money-saving tricks is to think about Valentine’s Day all year in a quiet way, not just on February 13th when the store shelves are empty. I do not stockpile random things, I just watch for deals on simple pieces that can work for lots of seasons.
When holiday stuff goes on clearance, I look for:
- Neutral pillow covers: cream, light gray, soft blush
- White candles or battery tea lights
- Simple wooden beads or wood garlands
- Plain frames in white, black, or gold
These are my “staples.” They are not covered in hearts or words, so I can use them for:
- Christmas
- Valentine’s Day
- Spring
- Birthdays
Then, when February rolls around, I mix those nicer basics with very cheap seasonal touches:
- Paper hearts taped to a mirror or tucked in frames
- Dollar store heart picks stuck in plants or jars
- Printed Valentine quotes in those same neutral frames
- One pack of heart-shaped doilies, used under candles or jars
A few examples of how this looks in real life:
- Neutral pillow covers + cheap heart add-ons
I keep cream covers on the couch all year. For Valentine’s Day, I pin or tape felt hearts in one corner. In March, the hearts come off, and the pillows stay. - White candles + paper hearts
I set up white candles in glass holders, then scatter paper hearts around the base on a tray. No need for special Valentine candles. - Wood bead garland + seasonal swap
My simple wood beads stay on the mantle, and I just clip on or tie on a few tiny hearts for February. For spring, I swap the hearts for flowers.
To avoid overbuying, I spend five minutes after I pack everything up and make a tiny list on my phone. I keep it in my “Holidays” note.
I write:
- What I used a lot this year
- What I never touched
- One or two things I wish I had
It might look like this:
- Used: white candles, wood beads, red ribbon, kids’ art hearts
- Wish list for next year: one nice faux greenery garland, fresh pillow covers
When I see sales later in the year, I only buy off that tiny list. It keeps me from grabbing random cute things that will just live in a bin.
With a little planning, some smart storage, and a habit of “shopping” our own homes, Valentine decor can stay fun and budget friendly every single year, not just this one.

Conclusion
When I step back and look at our house each February, I see proof that intentional color, cozy textures, and a few favorite spots can turn even cheap valentine’s day decorations into something warm and beautiful. With three busy boys racing through every room, I lean on simple palettes, soft blankets, twinkly lights, and that sweet mix of store-bought finds and crooked little kid-made hearts, and it still feels magical without adding money stress.
If you feel overwhelmed, just pick one spot to love on this week, maybe the kitchen table or your mantle, and start there. Invite your kids in, hand them some paper and tape, and let them help you build a tiny Valentine moment together. It will feel less like a chore and more like a memory, and you will both remember the giggles long after the hearts come down.