This post may contain affiliate links. Read the full disclosure here.
If you’re anything like me, you count down the days to December so you can break out the glue, paint, and glitter! Christmas is my favorite time to break up those chilly days with a fun family project, and our absolute favorite is the handprint christmas tree craft. My three boys just light up when they see the paint come out, and I love how each tiny handprint comes together to make something truly sweet.
We used this Christmas handprint craft kit and it turned into the cutest keepsake.
There’s something extra special about making a keepsake together that reminds us how little those hands once were. These moments turn into memories we’ll cherish for years (and nothing beats pulling out last year’s trees and seeing how much they’ve grown). Handmade tree crafts bring everyone together, cut down on screen time, and sprinkle a little more joy into the season. If you’re searching for something easy that brings big smiles, this project is always a hit. Let’s gather the kids, roll up our sleeves, and make some family magic!

Why I Love Making a Handprint Christmas Tree Craft With My Kids


Making a handprint christmas tree craft with my kids isn’t just another way to pass time before Christmas. It’s an event we all look forward to. These moments, covered in paint and glue with cheerful messes everywhere, bring us together in the realest sense. This tradition holds a special place in my heart because it’s easy, fun, and full of memories (and yes, the noisy chaos is part of the charm).
Watching Their Faces Light Up
Year after year, I watch my boys’ excitement bubble over as soon as I say, “Let’s get out the paint!” There’s something magical about dipping tiny (and sometimes not-so-tiny) hands into paint and pressing them down to create a tree shape. Every year, the giggles start as soon as the green paint appears. Each child wants to be first, and nobody minds if hands end up a little messier than planned.
I love snapping photos while we work. The pride in their eyes when they see their work go up on the fridge or become a gift is priceless. Seeing their personalities come out in the decorations, from wild glitter clumps to perfectly lined-up sequins, never gets old.
Making Memories That Last
The handprint christmas tree craft is more than just an art project; it’s a keepsake. Every year, I find myself running my fingers over last year’s dried paint, missing those smaller handprints just a bit (hard to believe how quickly they grow). It’s like a little time capsule with fingerprints and splashes only they could make.
Years later, when we unpack the boxes of Christmas keepsakes, these trees spark so many stories and laughs. We remember who couldn’t resist smearing their paint everywhere and who insisted on using every sticker in the jar. These memories stick with us far longer than any store-bought ornament.
Stress-Free, Screen-Free Fun
As a busy mom, I’m always juggling a million things, especially once December rolls around. I need activities that are simple and don’t create extra stress. The handprint christmas tree craft checks all those boxes. I don’t have to chase down special supplies or worry about the mess (a washable tablecloth and some wipes go a long way).
While screens are always tempting for my boys, this project pulls them away and encourages real connection. Hands get busy, imaginations wake up, and there’s no arguing over the TV remote. We play music in the background, sing along, and sometimes even end up having a little dance party while waiting for the paint to dry.
Creative Freedom for Everyone
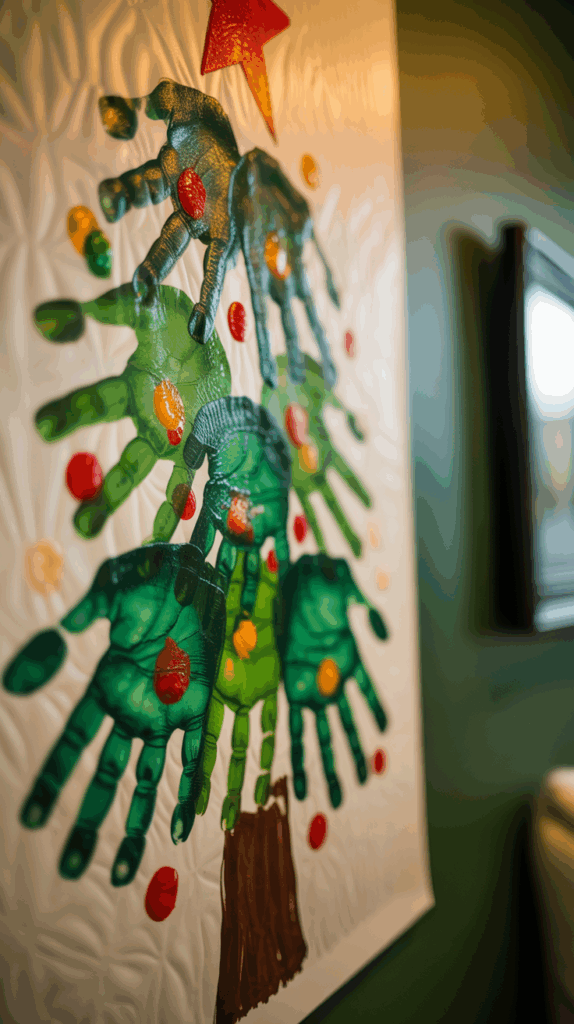
Some crafts have rigid rules or templates, but this one lets every child put their own twist on the finished tree. One of my sons likes to add “snow” with white paint, one piles on colorful pom-poms, and the littlest just goes wild with fingerprints. Every handprint christmas tree craft turns out a little different, and I love that.
If a branch gets smudged or a star ends up sideways, nobody cares. We can add more details or leave it simple. There’s no wrong way to do it! Each tree is one-of-a-kind, just like my boys.
It’s a Heartfelt (and Affordable!) Gift
There’s nothing like giving a gift that your child made with their own hands. Grandparents, aunts, and uncles light up when they get a handprint tree card or ornament. It means so much more than something bought at the store, especially since it shows off how much the kids have grown.
You don’t need fancy supplies. All it takes is a stack of paper, some washable paints, and maybe a few stickers or scraps from the craft bin. Everyone feels proud of what they made, and the cost stays low, even during a busy holiday season.
Why I’ll Keep This Tradition Going
I love a good tradition, and our handprint christmas tree craft is one I’ll hold onto as long as my kids will let me. It’s messy, noisy, and always joyful, which is everything I want the holidays to be. With every handprint, we make a little memory I can treasure, long after the last bit of paint has dried.
How to Set Up for the Handprint Christmas Tree Craft
Getting ready to make a handprint christmas tree craft with the kids is half the fun! I always try to keep things simple so there’s more time for giggles and less stress for me. The right setup helps everything go smoothly and keeps the focus on making memories instead of cleaning up messes. Before we even think about dipping those little hands in paint, here’s how I get our kitchen table ready for this special project.
Gathering Your Supplies
Nothing slows down the excitement like scrambling for missing supplies once you’ve promised a fun craft. I always start by collecting everything we’ll need ahead of time. This makes the whole process much easier.
Here’s what I usually grab:
- White or colored construction paper (for the tree background)
- Washable green paint (plus any other colors for decorations)
- Paintbrushes or sponges (for spreading the paint on little hands)
- Plastic plates or shallow dishes (the best for holding paint)
- Paper towels and baby wipes (trust me, you’ll want these nearby)
- Aprons or old t-shirts (protect everyone’s clothes)
- Decorations: stickers, glitter, pom-poms, markers, sequins, star-shaped cutouts, and glue sticks
If you don’t have something on hand, use what you’ve got—my boys have decorated their trees with buttons, leftover party confetti, or just added “ornaments” with markers and crayons.
Prepping Your Workspace
When it comes to painting with little ones, I love a setup that lets everyone get messy without worry. We use our kitchen table but any roomy, flat spot will work.
To prep our space, I like to:
- Spread out a plastic tablecloth or an old sheet. This saves my table from becoming a new art piece!
- Put the supplies right in the center so they’re easy to reach.
- Place a stack of wipes or wet paper towels nearby. Spills are almost guaranteed.
- Line up our paint in shallow bowls or plates, not deep cups, so the paint is easy for little hands to reach.
- Set a separate dish for each color if you’re using more than green. This keeps colors bright and avoids that all-too-familiar brown mush.
If your kids like to stand while they paint, I move the chairs to the side. Sometimes mine even pull up a step-stool to get a better angle—whatever keeps them comfy!
Getting the Kids Ready
I know how excited kids get when paint comes out, so I give mine a quick “paint talk” and help everyone suit up before we begin.
Here’s what helps things go smoothly:
- Change into play clothes or toss on old t-shirts to protect from stains.
- Tie back long hair, so nothing drags through the paint.
- Give each child their own paper and explain that we’ll be using handprints to make our tree.
A little structure up front means more freedom for creative fun later. If you’re making several trees (maybe for gifts), lay out extra paper to save time in between.
Keeping the Mess Under Control
Crafts with kids are never totally mess-free, but a few tricks help keep chaos in check. My best advice?
- Keep wipes and paper towels right at your fingertips.
- Ask each child to clean their hands with a wipe right after they press their hand down.
- Trickier hands (my youngest likes to “accidentally” get paint in his hair!) go straight to the sink for a quick wash.
After years of painted floors and sticky fingers, I’ve learned to always expect a little mess, but these steps help make cleanup quick and stress-free.
Creating a Welcoming, Fun Atmosphere
A successful handprint christmas tree craft isn’t just about supplies and setup. I like to set the tone with a little holiday cheer. I’ll turn on some favorite Christmas music, light a scented candle, or even have some cocoa ready for after we finish.
The goal is making this an experience everyone looks forward to. When the kids sense it’s special, they’re more excited…and way more likely to help clean up at the end!
With everything in place and ready, it’s time to start painting, pressing, and making those precious handprint trees. The excitement is just getting started!
Step-by-Step Guide to Making a Handprint Christmas Tree Craft
The moment I say we’re making a handprint christmas tree craft, my boys are out of their seats and elbow-deep in paint before I’ve even finished the sentence! If you’re like me, you want clear, easy steps so you don’t have to chase down directions while little hands get messier by the second. Here’s my tried-and-true process for making those adorable handprint trees, with all my best tips for picture-perfect prints and creative touches your kids will love!
Getting Perfect Handprints Every Time
Let’s be real—tiny hands wiggle. Paint gets everywhere. But a smooth, perfect handprint is magic and totally possible with a few tricks up your sleeve.
I always set up a mini assembly line so everyone knows their turn is coming. The boys love this part, and it keeps extra hands out of the paint when I’m helping someone else. Here’s how I make those handprints come out crisp and clear:
- Use a good amount of paint: Not dripping, but enough to cover the whole palm and fingers. I always use a paintbrush or sponge instead of dipping. No thick blobs means no streaks or missing spots.
- Spread fingers wide: Help them stretch out their fingers, even the pinky, so each “branch” is clear. Sometimes I make a little chant—“Wiggle, wiggle, freeze!”—to get them ready.
- Firm, gentle press: Guide their hand onto the page, smooth the palm and each finger with a gentle press. That way, every bit of the hand makes contact.
- Peel up straight: Lift their hand slowly, straight up, to avoid smears. This is the secret to crisp shapes! The boys get a big kick out of seeing their leaf-shaped prints.
- Clean hands right away: Hand them a wipe or head to the sink as soon as their print is done. This cuts down on stray paint everywhere (and on the dog, if you have a curious pup like ours).
Keeping things fun helps the process run smoothly. When a fingerprint smudge happens, we just call it “extra snow” or a new branch. The focus is on the memories, not perfection!
Personalizing Your Christmas Tree Craft
This is the part where my boys get to shine. No two handprint christmas tree crafts in our house ever look the same! After the prints dry, I let everyone go wild with decorating.
Some of our favorite ways to personalize:
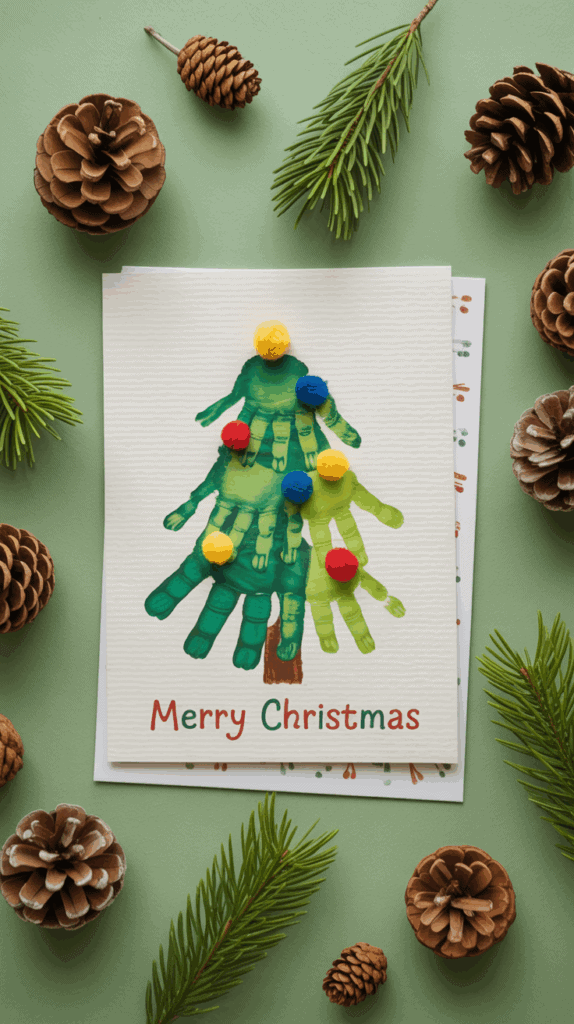
- Decorate with stickers and sequins: The boys scatter shiny stars, snowflakes, or little ornaments all over their trees. It looks so festive!
- Add a star at the top: We cut out yellow stars or use foam stickers. Sometimes someone decides a “moon” or even a dinosaur belongs on top—go with it!
- Pom-poms and beads: Tiny craft pom-poms make the best ornaments, especially when the glue gets a little squishy. The boys love pressing these on.
- Draw on lights with markers: We use glitter pens or just grab bold markers and swirl lights and garlands between the prints. The boys trade colors every few minutes.
- Write their names and the year: I encourage each child to sign their name. Little ones can scribble or stamp. Don’t forget the date—you’ll treasure seeing the handwriting (and spelling) later.
- Personal messages: Sometimes we write “Merry Christmas” or “Love you, Grandma!” to make it extra special if it’s for a gift.
I always tell the boys, there’s no “right” way to decorate. Some days they want to cover every inch in glitter, other times they keep it simple. Letting their personalities shine makes each tree a true keepsake.
With a little planning, some teamwork, and a lot of laughter, you end up with handprint christmas tree crafts that are full of heart and perfect to display (or gift!) all season long.
Displaying and Gifting Your Handprint Christmas Tree Masterpieces
After a joyful afternoon covered in paint and glitter, you’re left with the best part—admiring those adorable handprint christmas tree craft creations! Nothing beats seeing the kids’ art on display, and I always look for ways to show off their handiwork or wrap it up to share as heartfelt gifts. This is where the magic of all that effort really pays off. Bringing these keepsakes out every December instantly adds warmth to our home, plus they make the sweetest gifts for family and teachers.
Showcasing Your Kids’ Art at Home
Displaying our handprint christmas tree crafts is my favorite way to decorate for the season. The boys light up every time they see their own work on the wall or shelf. There are so many simple options, and you don’t need fancy frames or supplies for any of them.
Some of my go-to display ideas:
- Hang them on the fridge: Classic and easy! I use fun magnets so the trees get a prime spot.
- Make a holiday gallery wall: Grab some washi tape and create a playful “art show” in the hallway or by the tree. The kids love seeing their pieces lined up.
- Clip to twine or ribbon: String a cord across a window or mantel, then use clothespins or mini clips to hold each tree. This setup is so cheerful, and you can rotate new crafts in all season.
- Frame your favorites: Even inexpensive frames look special with a child’s art inside. I let each boy pick which tree gets a “place of honor” so everyone feels proud.
- Stand up on a shelf or mantel: If you use cardstock or back the paper with cardboard, these crafts stand easily. I sneak a few behind our favorite Christmas books for a cozy look.
Sometimes, I even tuck a handprint tree into our Advent calendar or attach it to a door for a festive surprise. Every room gets a little extra sparkle!
Turning Handprint Trees Into Heartfelt Gifts

One thing I cherish most about the handprint christmas tree craft is how it becomes a true treasure for grandparents, teachers, or anyone who loves your kids. These simple projects end up meaning so much. No trip to the store can compete with the love in a one-of-a-kind, handmade keepsake.
Here are some favorite ways to give handprint trees as special gifts:
- Holiday cards: Fold the finished tree onto a greeting card or attach it to the front of a blank card. Add a child’s message inside for a personal touch.
- Gift tags: Cut the trees into smaller pieces and punch a hole at the top. String a ribbon through for homemade gift tags that double as keepsakes.
- Framed art for family: Kids love wrapping up their paintings like “real presents.” Add a little ribbon and a tag from your child.
- Keepsake ornaments: If you make the handprint on shrink plastic or sturdy foam, it’s easy to cut out and hang with ribbon as a tree ornament. Flat laminated versions also work well and last for years.
If we’re giving gifts to a classroom teacher or neighbor, the boys sometimes help make a whole “forest” of mini trees on one big sheet. They sign their names in colorful marker, and we slide the masterpiece into a large envelope with some holiday treats.
Adding a Special Touch to Gifts
Kids feel extra proud when their art looks festive. A few little finishing touches can turn any handprint christmas tree craft into a true standout.
Some fun and easy ideas:
- Add glitter accents: Outline the tree or the star with glue and shake a bit of glitter for sparkle.
- Personalize with the year: I always write the date on the back, and sometimes add a label like “Made with love by [child’s name].”
- Include a photo: Tape a small photo of your child next to the tree for a fun scrapbook effect.
- Tie with ribbon or twine: For gifts, I tuck each tree into a cellophane bag and add colorful ribbon on top—so cute and simple.
When we give these out, I love seeing how touched people are. Sometimes the simplest homemade item really becomes the most treasured. If you’re ever scrambling for a last-minute gift, these crafts save the day and let your kids’ personalities shine.
Preserving and Storing Your Masterpieces
After the holidays, I never want to part with my boys’ art. Over the years, I’ve found a few tricks for saving these creations so we can enjoy them year after year.
- Laminate important pieces: I use inexpensive self-adhesive sheets or take them to a print shop so favorite trees last and last.
- Store flat in a keepsake box: I keep a large, labeled box just for holiday art and handprints, which helps keep everything organized and safe.
- Make a yearly scrapbook: Slip each year’s handprint tree into a page protector. Your child can flip through over the years and see how much they’ve grown.
- Take photos before storing: Sometimes, the crafts don’t survive busy little hands for long. I snap a quick photo of each piece so we always have the memory.
There’s nothing like unpacking past years’ trees when December arrives. Seeing those old handprints is like flipping through a family time capsule.
Creating Traditions With Your Handprint Trees
Our handprint christmas tree craft has become so much more than a quick project—it’s a holiday tradition that pulls everyone together. Displaying the trees, swapping stories about former crafts, and gifting art to loved ones brings the spirit of the season into every corner of our home. Every year, when the boys see the old trees sitting on the mantel or tucked in our Christmas bins, the excitement kicks off all over again.
Whether you’re sharing your creations proudly on the wall or tucking them into a loved one’s gift bag, each handprint tree turns into a little reminder of what matters most: family, laughter, and those paint-splattered memories you build together.
Clean Up and Keeping the Memories Alive
When the whirlwind of paint, glue, and laughter winds down, you’re left with two things: a happy mess and a handful of heartwarming keepsakes. If you’re anything like me, the post-craft chaos from a handprint christmas tree craft might look like you hosted a tiny elf party in your kitchen! But cleanup doesn’t have to be stressful, and with a few smart tips, you can make this part almost as much fun as the project itself. What matters most to me is keeping the memories alive—those painty little handprints are more than a project, they’re family history. Here’s how I tidy up and make sure our handprint trees stay special for years.
Easy Tips for Quick Cleanup
Getting the mess under control is all about having a quick routine. Over the years, I’ve picked up some little tricks that save me time (and my sanity).
Here are my must-do steps for cleaning up after a full day of creating:
- Gather Used Supplies: Toss dirty paintbrushes and sponges straight into a bowl of warm, soapy water. This stops the paint from drying and makes washing up much easier.
- Wipe Down Surfaces: Wipes or a wet cloth work magic on sticky tables, chairs, and even little hands. A quick circle around the room grabs stray paint drops before they become new “decorations.”
- Contain the Glitter: Shake loose any extra glitter or sequins onto a spare sheet of paper, then fold and funnel it back into the jar. Less waste, less mess!
- Sort & Store Leftovers: Small bins or zip-top bags keep extra pom-poms, stickers, and foam shapes from winding up everywhere. I pop these back in our main craft box for next time.
- Check for Painty Prints: Do a quick sweep for mystery handprints on doors, counters, and, yes, the dog. Kids move fast!
Getting kids involved makes cleanup go so much faster. I always hand my boys a wipe or two and turn tidying into a game—who can collect the most stray sequins or find the silliest paint splat?
Making the Craft Last: Simple Preservation Tricks
Once everything is clean, it’s time to focus on what really matters—keeping those precious handprint christmas tree craft masterpieces safe. I love looking back on these and seeing the growth from year to year!
Here’s how I make sure nothing gets lost or ruined:
- Let Everything Dry Flat: Lay finished trees out on a clean counter or table. I give ours plenty of time to dry before stacking or moving anything so the designs don’t smudge.
- Label With Names and Dates: While the boys are busy elsewhere, I flip each piece over and jot down the year with a quick note (and sometimes a little inside joke about that day).
- Laminate Favorites: For extra special trees or ones with lots of glue, I use self-adhesive laminating sheets. This keeps the art from crumbling or flaking and means I can display them for years.
- Create a Keepsake Folder: Each child has their own folder or expanding envelope for storing their best creations. It’s a simple way to keep memories organized, and the kids love looking through their old projects.
- Snap a Photo: Sometimes the best way to preserve a messy, glue-heavy project is by taking a picture. I make sure to capture the finished tree and a candid shot of the boys holding it—double the memory in one quick snap.
Building Special Family Traditions
If you’re sentimental like me, these handprint christmas tree crafts turn into real family treasures. Every December, when we pull out our Christmas bins, the boys ask to see their old trees. Seeing those tiny, painted handprints alongside their current ones fills my heart every single year!
Some ways we keep the tradition alive and the memories close:
- Make a Yearly Art Banner: String each year’s handprint tree along a ribbon. Hanging it above the mantle or in a favorite spot helps everyone see the growth over time.
- Add to a Christmas Scrapbook: Gluing in one tree per page with a snapshot of the crafting day gives us a family album filled with smiles and stories.
- Gift Leftovers to Family: Any trees we have extras of go into cards for grandparents, aunts, and uncles. Their reactions never get old!
These little touches don’t just keep our memories neat and tidy—they bring the joy of the holidays back every time we see them. Cleanup and storage are the final steps in a day full of creativity, fun, and laughter. By organizing the chaos and cherishing every handprint, we’re building a holiday tradition that means as much to me as any shiny ornament on the tree.
Conclusion
Making a handprint christmas tree craft with my boys fills our home with laughter, color, and memories that I’ll treasure for years. These simple projects always bring us closer and remind me what really matters during the holidays; it’s about togetherness, fun, and those tiny hands we want to remember forever. Moms, if you decide to try this with your own crew, I’d love to hear how it goes or see your little trees in action!
Share your favorite moments or photos below—I know every family’s creations will be one-of-a-kind. Thanks for making space in your busy days to build traditions and keep the wonder alive. Every handprint tells a story and I can’t wait to see what you and your kids create next!